The forums › Quizz, Fav TV, Fav Music, Fav Films, Books… › Easy Recipes to tickle your Tastebuds
- This topic has 127 replies, 3 voices, and was last updated 1 year, 1 month ago by JessiCapri.
-
AuthorPosts
-
November 1, 2022 at 5:26 pm #200547
And another for those cold wintery nights
Spicy pumpkin soup

Ingredients
1 pumpkin, about 1.5-2kg (save the seeds – toast them in a dry pan to serve)
1tbsp garam masala
2tsp ground coriander
2tsp ground cumin
½-1tsp chilli flakes or powder, plus a pinch
3tbsp olive oil
1 onion, finely chopped
ginger, peeled and finely chopped
2 garlic cloves, finely chopped
900ml veg stock
100ml double cream or crème fraiche, plus extra to serveMethod
STEP 1
Heat the oven to 180C/160C fan/gas 4. Cut the pumpkin in half and remove the seeds with a spoon (see tip below). Cut into wedges or chunks (keep the skin on) and tip into a bowl. Put the garam masala, and 1 tsp each of the coriander and cumin into a small bowl and mix with 2 tbsp of the oil and season. Drizzle over the pumpkin and toss well to coat in the spiced oil. Transfer to a baking tray, spread out evenly and roast for 40-45 mins, turning halfway through cooking, until the pumpkin is very soft when pierced with a fork. Leave to cool on the tray for a few minutes.STEP 2
Heat the remaining 1 tbsp olive oil in a large saucepan and fry the onion with a pinch of salt for 10 mins until soft. Add the ginger, garlic and remaining spices and chilli flakes, and fry for a few more minutes until fragrant. Pour in the stock and bring to a gentle simmer.STEP 3
When the pumpkin is cool enough to touch, use a spoon to scoop the soft flesh from the skins. Add the soft pumpkin to the stock pan, discarding the skins. Remove from the heat and blitz the soup with a hand blender until creamy and smooth. Season to taste, adding extra chilli or garam masala if you like. Put back over a low heat and stir in the cream. Bring to a gentle simmer, then serve in bowls with a drizzle more cream and a pinch of chilli to serve. Top with toasted pumpkin seeds, if you like.Recipe tip
1. Wash the seeds well and remove any strings and flesh.
2. Dry, and toss in oil and any spices you like.
3. Transfer to a baking tray and toast in a hot oven for 10-15 mins until golden and crisp.
4. Use to scatter over the soup, or salads.
5. Will keep for a week in an airtight container.Roasted Pumpkin
November 1, 2022 at 5:58 pm #200548Quick and easy breakfast.
Loaded Avocado Toast With Soft Scrambled Eggs
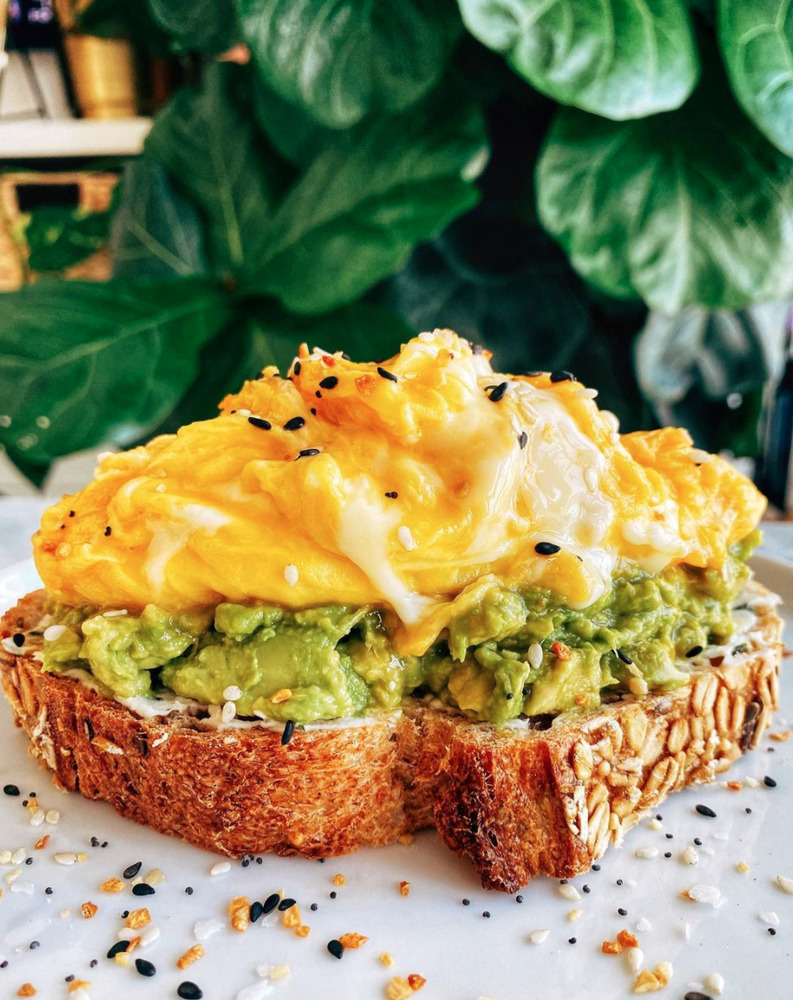

This quick and easy avocado toast topped with soft scrambled eggs is the perfect breakfast or lunch in a hurry.
Recipe
2 slices bread (or any bread of your choice)
Chive cream cheese or Butter or Margarine
1 ripe avocado
2 whole eggs
Lemon Juice
Pinch of Salt & PepperMETHOD
STEP 1
Toast a couple of rounds of bread of your choiceSTEP 2
Spread Chive cream cheese on the toast or margarine/butterSTEP 3
In a bowl, mash an avocado with a fork. Add a couple of squirts of lemon juice. Spread the mashed avocado on your toast.STEP 4
In a separate bowl, whisk two eggs together. Season with salt & pepper to taste.STEP 5
Heat a little oil on a pan at low-medium heat. Pour in the eggs, and slowly push the edges towards the middle as the eggs begin to cook. Once cooked and scrambled to your liking place the eggs on top of your toast.STEP 6
Enjoy.November 17, 2022 at 9:10 pm #200645
Christmas Baklava
Ingredients :
1/2 pound finely chopped pecans
1/2 pound finely chopped walnuts
2-3 tbsp. ground cinnamon
1 pound package of Phyllo dough
1-1/2 cups butter, melted
2-1/2 cups honey
1 tsp. vanilla
1 tsp. grated lemon zestDirections :
Mix nuts together in a large bowl and toss with the ground cinnamon. Set aside.Butter a 9×13 inch baking dish.
Place 2 sheets of phyllo in the bottom of prepared dish. Brush generously with melted butter.
Sprinkle 2-3 tablespoons of nut mixture on top. Repeat layers, buttering each layer, until all the nuts, butter, and phyllo are used.
End with about 6 layers of phyllo on the top. If you still have some butter left, brush it over the top layer.
Using a very sharp knife, cut through all layers of the baklava. Cut 3-4 sliced length-wise.
Then make diagonal cuts to make diamond shapes.Bake in heated 350 degree oven for about 45 minutes, until golden and crisp.
While baklava is baking, heat honey in a sauce pan until close to boiling. Stir in vanilla and lemon zest.
When baklava is done baking, immediately pour the honey mixture over the top.
Let cool completely in the pan.
November 17, 2022 at 9:13 pm #200646
The ingredients might make you doubt this recipe. Try it first. My kids have nicknamed these “Crack Meatballs” because they are addicting.
First melt the jelly in a saucepan stirring often on low heat. Add the full bottle of chili sauce and mix well. When heated add the meatballs. Cook until meatballs are heated through and well coated. Nothing could be easier. This is a fave for football game parties.
November 17, 2022 at 9:18 pm #200648 November 17, 2022 at 9:24 pm #200650
I cover the glass with a tea towel to keep the glass from cooling too fast.
Top Tip.
As most of you know, boiling water and glass can crack and cause a mess.
To avoid, just place a stainless steal spoon in the glass before pouring the water in.
It will heat the glass and wont break it.
November 17, 2022 at 11:28 pm #200656Slow Cooked Beef and Pumpkin Chilli
Course : Chilli, Main Course
Cuisine: American, MexicanWhen the evenings start to get darker and chillier, what could be better than a big pot of Beef and Pumpkin Chilli cooking away in the slow cooker all day, ready for a quick and easy meal come dinner time? (Serves 6-8 depending on appetite.)

Prep Time: 10 minutes
Cook Time: 2 hours
Total Time: 2 hours 10 minutes
Servings: 8 people
Calories: 507kcalIngredients
Metric – US Customary
2 tablespoons olive oil
2 onions red or white, diced
1 kg (2 lb) beef mince or stewing beef diced
6 cloves garlic crushed or grated
1 teaspoon chilli flakes or to taste
2 teaspoons cumin
2 teaspoons smoked paprika
2 x 400 g (14 oz ) tins chopped tomatoes
2 teaspoons oregano
Salt and pepper to taste
400 g pumpkin or butternut squash cut into bite sized chunks
2 red peppers cut into bite sized chunks
2 x 400 g (14 oz) tins black beans drainedRice, tortilla chips or soft tortillas to serve
Guacamole and salsa or finely diced onion, tomatoes and avocado to serveInstructions
1. Place the olive oil and onions in a large pan and fry over a gentle heat for 5 minutes until softened but not brown.
2. Turn the heat up and add the beef.
3. Fry for 3 minutes or until the beef and onions are browned.4. Lower the heat again and add the garlic, chilli and spices.
5. Cook for 2 minutes.
6. Add the tomatoes, oregano, salt and pepper and bring to the boil.Oven:
7. Transfer the chilli to a lidded ovenproof dish and cook for 1-2 hours.
8. Remove from the oven, add the pumpkin, red pepper and black beans and cook for a further 1 hour or until the pumpkin is soft and the beef is tender.OR
Slow Cooker on high:7.Add the pumpkin to 6 above in the pan on the hob and bring back to the boil.
8. Transfer the chilli to your slow cooker and cook for 4-5 hours.
9. Add the red pepper and black beans and cook for a further 1 hour or until the pumpkin is soft and the beef is tender.OR
Slow Cooker on low:7. Add the pumpkin to 6 above in the pan on the hob and bring back to the boil.
8. Transfer the chilli to your slow cooker and cook for 6-8 hours.
9. Add the red pepper and black beans and cook for a further 2 hours or until the pumpkin is soft and the beef is tender.Notes
1. The timings are a little flexible so you can fit this into your life.
2. Meals like this are really very flexible and can take a little extra cooking if need be. Choose whichever time best fits into your lifestyle.
3. If you can’t be home when the vegetables need to go into the slow cooker simply put them in from the start. They will lose their texture a little but will otherwise be fine. You may even prefer it this way, if you are not keen on vegetables!November 17, 2022 at 11:50 pm #200657Hungarian Beef Goulash
Course: Main Course
Cuisine: HungarianThis Easy Hungarian Beef Goulash features meltingly tender beef in an unbelievably delicious sauce flavoured with paprika and caraway seeds. Quick and easy to prepare and very little washing up. What’s not to like?

(Serves 4-6 depending on appetite and accompaniments)
Prep Time 15 minutes
Cook Time 2 hours
Total Time 2 hours 15 minutes
Servings 6 people
Calories 495kcalIngredients
Metric – US Customary
2 tablespoons olive oil
2 medium onions sliced
90 g (3 oz) smoked lardons or chopped smoked bacon (I use Tesco Finest Smoked Lardons)
4 teaspoons smoked paprika
½ teaspoon caraway seeds
3 cloves garlic crushed or finely chopped
800 g (1¾ lb) stewing beef chopped into cubes
400 g (14 oz) tin chopped tomatoes
Salt and pepper
1 large red pepper chopped into chunks
1 large green pepper chopped into chunksTo Serve…
Brown rice (or white rice/pasta/mash)
Sour cream optional
2 tablespoons parsley optionalInstructions
1. Preheat your oven to 160C / 140C fan / gas mark 3 / 325F.
2. Put the onion and olive oil in an ovenproof saucepan or hob-proof casserole dish and fry gently, with the lid on for 5 minutes, until the onions are softened but not brown.
3. Add the lardons (or chopped streaky bacon) and turn up the heat.
4. Fry for 3 minutes until the lardons and onions have a little colour.5. Turn down the heat and add the paprika, caraway seeds and garlic.
6. Fry for 1 minute.
7. Add the beef and fry for 2 minutes until starting to gain a little colour.
8. Then add the tinned tomatoes, salt and pepper and bring to the boil.10. Put the lid on and transfer to the oven. (If you haven’t used an ovenproof pan, transfer to an oven dish before putting in the oven).
11. Cook for 1 hour.
12. After 1 hour, remove from the oven and add the chopped up peppers and stir.
13. Cook for a further 1 hour.14. Serve with brown rice or rice of your choice, sour cream and a sprinkling of parsley.
Slow Cooker Instructions
10. Follow the instructions above, but instead of putting the goulash in the oven, place it in your slow cooker.
11. Cook on high for 4 hours, or on low for 6-8 hours.
12. Add in the chopped peppers 1 hour before the end.Notes
Suitable for freezing.November 18, 2022 at 2:28 am #200658Super Shepherd’s Pie
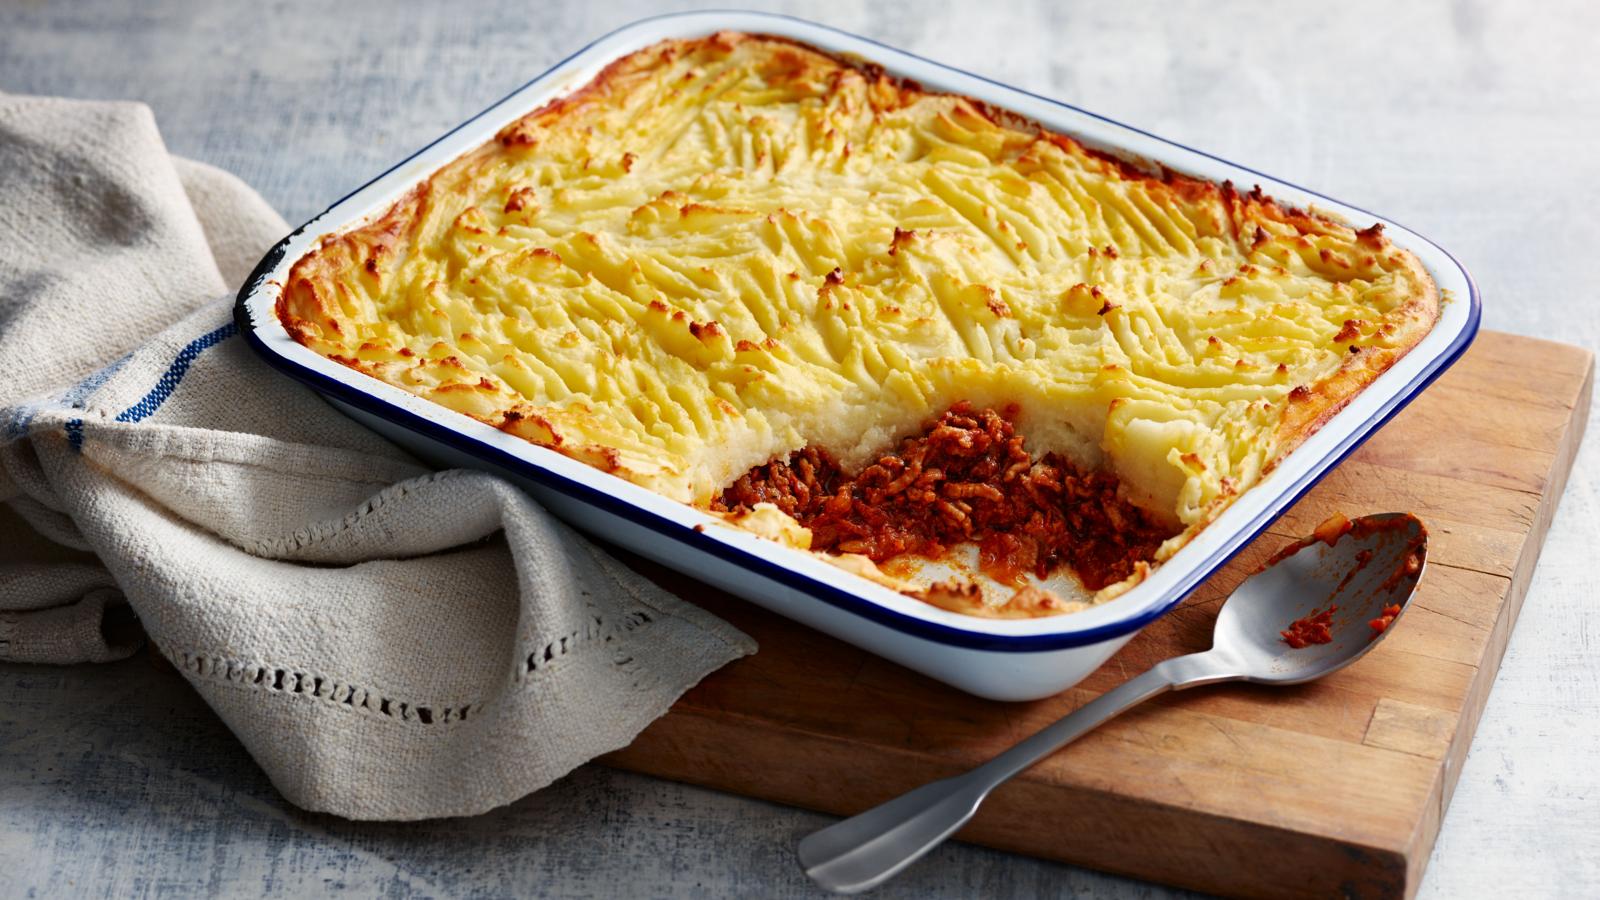
“Lean minced lamb works a treat here, and gives us a bumper hit of vitamin B12, keeping our immune and nervous systems healthy and preventing a drop in our energy levels. ”
SERVES 6
COOKS IN 2 HOURS 15 MINUTES
DIFFICULTY NOT TOO TRICKYIngredients
G / ML CUPS / OZ
500 g (1 lb) lean minced lamb
2 sprigs of fresh rosemary
1 x 400 g (15-oz) tin of cannellini beans
2 onions
2 carrots
2 sticks of celery
250 g (8 oz) chestnut mushrooms
1 heaped tablespoon plain flour
800 ml (3¼ cups) organic chicken or veg stock
800 g (1¾ lbs) swede (Rutabaga)
800 g (1¾ lbs) potatoes
2 tablespoons semi-skimmed milk
15 g (½ oz) mature (sharp) Cheddar cheese
1 tablespoon Worcestershire sauce
1 teaspoon mint sauce
350 g (3½ cups) frozen peasMethod
1. Put the ground lamb into a cold casserole pan. Place on a high heat, add a really good pinch of black pepper, and cook for 15 minutes, or until dark golden, breaking it up with a wooden spoon.
2. Pick and finely chop the rosemary leaves, drain the beans, then stir both into the pan. Cook and stir for 8 minutes, or until the beans start to pop and it’s all getting dark and gnarly.
3. Peel the onions and carrots, trim the celery, wipe the mushrooms clean, then finely chop it all (or blitz in a food processor).
4. Stir into the pan and sweat for 10 minutes on a medium-high heat, stirring occasionally.
5. Stir in the flour, followed by the stock.
6. Bring to a boil, then simmer on a low heat with the lid on for 30 minutes.7.Meanwhile, preheat the oven to 350°F.
8. Wash the Swede (rutabaga) and potatoes (leaving the skins on for extra nutritional benefit) and cut into 1¼-inch chunks.
9. Cook just the rutabaga in a large pan of boiling salted water for 10 minutes, add the potatoes for 10 more minutes, or until cooked through, drain well, mash with the milk and grated cheese, and season to perfection.
18. Check the consistency of the ground lamb—you want it slightly wetter than you think, as it will thicken further in the oven.19. Add the Worcestershire and mint sauces, taste, and season to perfection.
20. Sprinkle the peas over the ground lamb, letting them sit on the surface to help prevent the mash from sinking in too much.
21. Put spoons of mash randomly on top, using a fork to scuff it up and make valleys and mountains, increasing the surface area and the crispy bits.
22. Bake for 50 minutes, or until golden and bubbling.Serve with seasonal greens.
November 18, 2022 at 8:39 pm #200659Roast Chicken
What Size Chicken?
There are different types of chicken; for example, a Cornish hen is a tiny chicken that feeds one person.
A game hen is a young chicken that weighs less than two pounds,
while a broiler or fryer is approximately seven years old and ranges between 2 1/2 to 4 1/2 pounds.Here a roaster chicken is recommended, which is between 8 to 12 weeks old and weighs an average of 5 to 7 pounds.
Generally speaking, this will yield about 6-7 cups of diced cooked meat, plus bones to make a delicious stock for stew.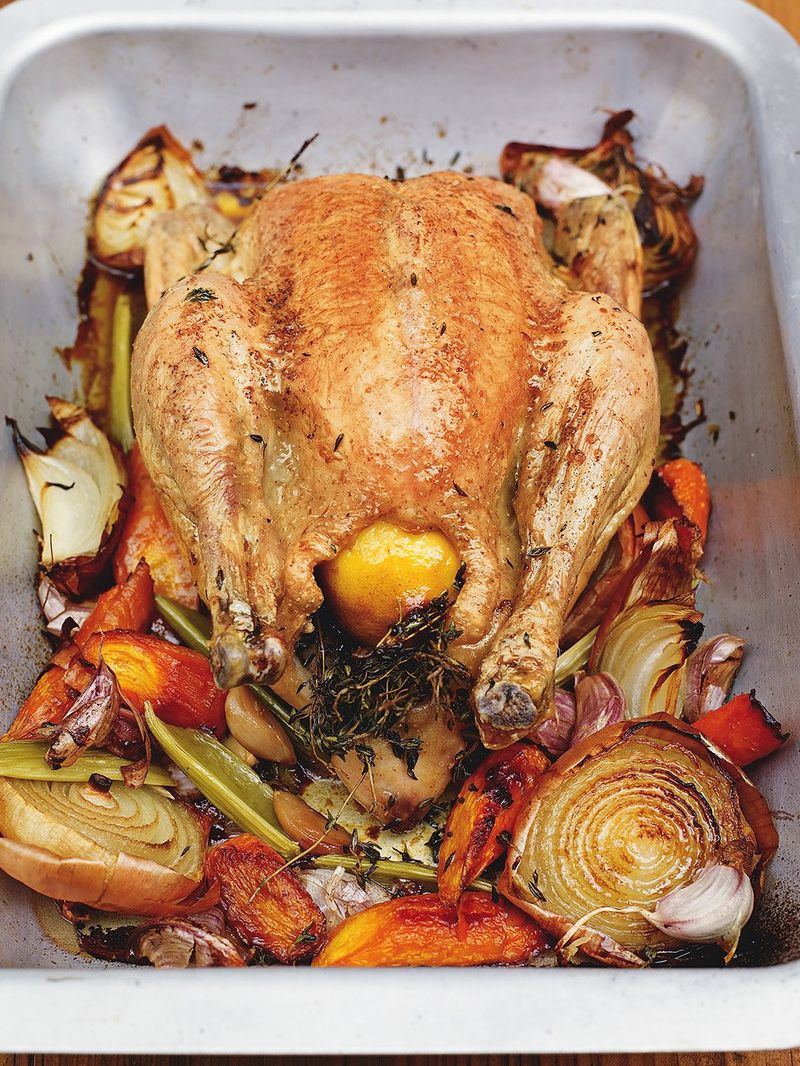
ROAST CHICKEN
1 Large, fat roaster chicken, around 5lb. The cost of these chickens average around £5.
If you have a larger family, opt for two chickens to make it stretch further.Ingredients
1 x 2 kg (5 lb) chicken
2 medium onions
2 carrots
2 sticks of celery
1 bulb of garlic
olive oil
1 lemon
1 bunch of mixed fresh herbs , such as, thyme, rosemary, bayOptional Vegetables for serving:
As well as the above, consider roasting potatoes and parsnips and crucifers like Brussels sprouts, broccoli, and cauliflower which also roast well.
Boiling vegetables like, peeled and cubed potatoes to make mashed potato and also boiling green beans, broccoli and asparagus for serving with your chicken dish.Method
1. Remove the chicken from the fridge 30 minutes before you want to cook it, to let it come up to room temperature.
If frozen, let it defrost overnight. Make sure its fully defrosted before cooking.
2. Preheat the oven to 240°C/475°F/gas 9.3. Wash and roughly chop the vegetables – there’s no need to peel them. Break the garlic bulb into cloves, leaving them unpeeled.
4. Pile all the veg, garlic and herbs into the middle of a large roasting tray and drizzle with oil.
5. Drizzle the chicken with oil and season well with sea salt and black pepper, then rub all over the bird. Place the chicken on top of the vegetables.
5. Carefully prick the lemon all over, using the tip of a sharp knife (if you have a microwave, you could pop the lemon in these for 40 seconds at this point as this will really bring out the flavour). Put the lemon inside the chicken’s cavity, with the bunch of herbs.
6. Place the tray in the oven, then turn the heat down immediately to 200°C/400°F/gas 6 and cook for 1 hour 30 minutes.
7. If you’re doing roast potatoes and veggies, this is the time to crack on with them – get them into the oven for the last 45 minutes of cooking.
Obvious choices are root veg: like carrots, potatoes, and parsnips.
But crucifers like Brussels sprouts, broccoli, and cauliflower roast well, too.8. Baste the chicken halfway through cooking and if the veg look dry, add a splash of water to the tray to stop them from burning.
9. Boiling vegetables for serving with the chicken is also an option for mashed potato, green beans, broccoli and asparagus.
10. When the chicken is cooked, take the tray out of the oven and transfer the chicken to a board to rest for 15 minutes or so. Cover it with a layer of tin foil and a tea towel and leave aside while you make your gravy and mashed potato.
11. To carve your chicken, remove any string and take off the wings (break them up and add to your gravy, along with the veg trivet, for mega flavour).
Carefully cut down between the leg and the breast. Cut through the joint and pull the leg off.
Repeat on the other side, then cut each leg between the thigh and the drumstick so you end up with four portions of dark meat.
Place these on a serving platter.You should now have a clear space to carve the rest of your chicken. Angle the knife along the breastbone and carve one side off, then the other.
When you get down to the fussy bits, just use your fingers to pull all the meat off, and turn the chicken over to get all the tasty, juicy bits from underneath.11. You should be left with a stripped carcass, and a platter full of lovely meat that you can serve with your piping hot gravy and some delicious roast veg.
Don’t put the entire bird out, instead carve the meat off and reserve at least half of it for other meals, such as a chicken salad sandwiches / wraps.
When you’ve picked the carcass nearly clean, you can toss it into the crockpot or stockpot and simmer cover it with water.
Add a finely diced onion, 2 tsp of turmeric, some finely diced celery and simmer for several hours on low, covered.
You’ll have a fabulous nourishing stock that can be used to make soups or stews.FAQs
1. Is it better to roast a chicken covered or uncovered?
There’s no need to cover your chicken for roasting, as the time it takes to cook means the skin should brown just enough to be perfectly crispy.2, How do you roast a chicken so it doesn’t dry?
Baste the chicken in its cooking juices halfway through cooking to make it succulent and delicious for when it’s time to carve.3. What temperature is best for roasting chicken?
Preheat the oven to 240°C/475°F/gas 9, then as soon as you put your chicken in the oven, reduce the heat to 200°C/400°F/gas 6.November 19, 2022 at 9:23 pm #200666Chicken Carcass Soup
This chicken carcass soup is a great way to use up leftovers from a roasted or rotisserie chicken. It’s from-scratch chicken noodle soup that is easy, warming, and completely delicious
This recipe is for the day after (or the day after the day after) you’ve roasted a chicken. When the carcass is picked bare and your beautiful golden bird is mostly just a pile of bones.
Time to make some chicken carcass soup.

Ingredient Notes
Chicken carcass:
The larger your chicken, the more flavor your chicken stock will have. If you have a particularly small rotisserie chicken, you can save it in your freezer until you have another one and cook two at once for maximum flavor. This recipe will also work with a turkey, though if you like, you can double the rest of the recipe because of the significantly larger carcass.Filtered water:
You don’t *have* to use filtered water for your stock, but if you don’t like the taste of your tap water, don’t use it in your soup. 😉
Two sets of carrots, onions, and celery: You’ll use two sets of vegetables in this soup. The first will simmer with the stock to help flavor it and then be discarded (the veggies will be mushy and flavorless after the long simmer), and the second set will be added to the soup.How to Make Chicken Carcass Soup
1. Prep your chicken:
To start, take your chicken carcass and remove and reserve any leftover chicken meat from the bones.
If there are more than two cups of meat, great. You’ll use that in the soup. If not, we’ll cook some chicken later to add to it.2. Use a pair of good kitchen shears, a sharp chef’s knife, or cleaver to chop up the carcass just enough so that you can lay the bones mostly flat.
3. Then heat a tablespoon of oil in a large pot over medium-high heat and add your bone pieces.
This recipe is great for so many reasons. First, because the name is just deliciously gruesome and second, because there is something *so* satisfying about making a pot of soup from scratch without even a can of broth.
1. Cut chicken bones in a pot.
2. Brown the chicken bones: Cook, using cooking tongs or chopsticks to turn the pieces occasionally, until bones and remaining skin are browned. Any meaty bits still attached won’t brown much, but the fat and the bones should turn nicely golden.
3. Add the rest of the stock ingredients: Add a splash of water to deglaze the pan and scrape all the browned bits off the bottom with a wooden spoon.
4. Then add a couple of roughly chopped carrots, celery ribs, and half an onion, along with about 10 cups of water and a little salt.
5. Bring the water to barely a simmer (watch closely to make sure it never comes to a boil as that can make your soup cloudy), and then turn the heat down to keep it there.6. Simmer:
Simmer for 90 minutes, scraping fat off the surface of the water occasionally, and checking to make sure your broth has not started to boil.
If there were less than two cups of meat remaining on your chicken, now’s a good time to cook a couple of chicken breasts.7. Finish stock:
You’ll know your stock is done when it has a good chicken flavor. If it still tastes too watery after 90 minutes, simmer it a little longer.
8. Once the stock is done, use a large slotted spoon to remove and discard large pieces of bone and vegetable before straining broth through a fine-mesh strainer.9. Start your soup:
Rinse pot to remove any chicken or vegetable remnants and return broth to pot.
10. Bring to a simmer and add chopped carrots, celery, onion, and spices.
11. Those simmer for 20 to 25 minutes, until tender.12. While your vegetables cook, cook 1 to 1½ cups of noodles (depending on your preferred broth to noodle ratio) in a separate pot until just al dente.
Cooking your pasta separately keeps it from soaking up all your broth and gives you complete control of the cooking time.
Egg noodles in chicken soup is a great add.13: Add pasta and chicken:
When noodles and veggies are done, add cooked (and drained) pasta and chicken to the pot of broth.14. Stir everything together and add more salt and pepper to taste.
15. Bring to a simmer and cook for 1 minute longer to make sure the chicken is heated through.16. Enjoy: Serve and enjoy.
Serve your soup with a slice of crusty bread.November 24, 2022 at 4:42 pm #200783Easy Chicken Paella
If you’re never made paella before, here’s how with this EASY recipe ready in 45 minutes!!
Juicy chicken and tender rice with onions, peppers, tomatoes, and more! So much FLAVOR in every bite!!
It’s a centuries-old Spanish dish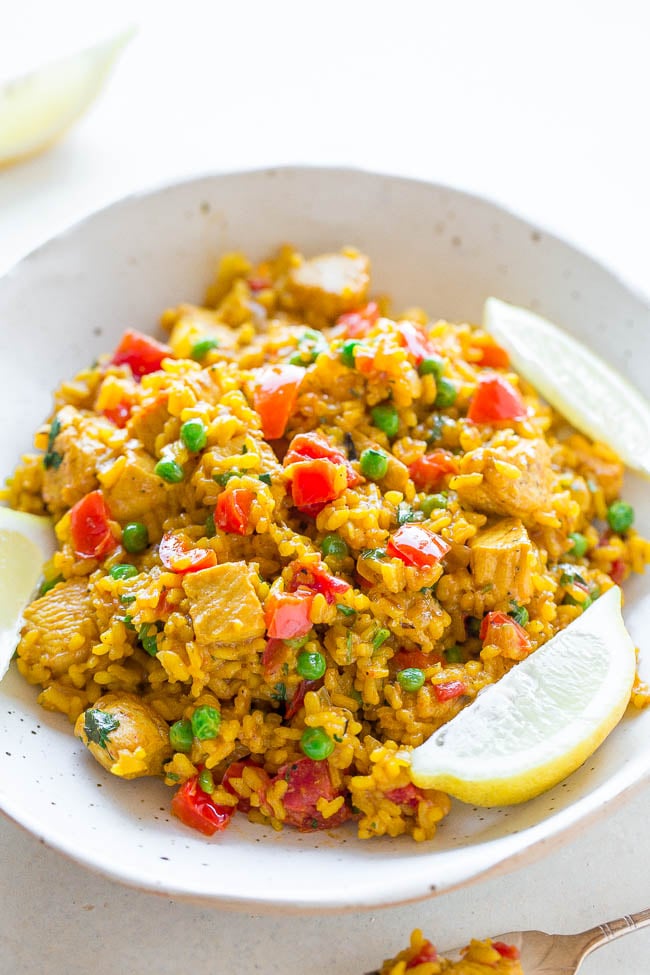
INGREDIENTS
4 tablespoons olive oil, divided
1 large onion diced small
1 red bell pepper, trimmed, seeded, and diced small
3 cloves of garlic, pressed or finely mincedAbout 1.25 pounds boneless skinless chicken breast, diced into bite-sized pieces, seasoned with salt and pepper
1.1 pounds White Rice (Bomba Rice – Bomba rice is a short-grain variety of rice, primarily cultivated in the eastern parts of Spain. It is commonly used in paella.)
4 cups (32 ounces) low-sodium chicken broth
1 packet Paellero – (Paellero is a paella seasoning mix which contains all the spices required to give an incredible taste to your paellas.
The main ingredients are garlic, paprika, clove and saffron.)one 15-ounce can petite diced tomatoes
1 cup water (or additional chicken broth), as necessary
1 cup peas (I use frozen that I added straight from freezer)
1/4 to 1/3 cup fresh flat-leaf Italian parsley or coriander, minced
salt and pepper, to tastelemon wedges, for garnishing
Use a paella pan, or a large skillet (frying pan) or a wok.
You can also add or replace the chicken with chorizo (a spicy sausage) or you favorite seafood, including prawns/shrimp, mussels, lobsters, or clams. Add as for chicken.INSTRUCTIONS
1. To a large skillet (15+ inches in diameter if possible) or paella pan or wok, add 2 tablespoons olive oil, onion, pepper, and sauté over medium-high heat until vegetables begin to soften and lightly caramelize, about 5 to 8 minutes; stir intermittently.
2. Add the garlic and cook until fragrant, about 1 minute; stir intermittently.
3. Remove the sofrito (the onion, pepper, and garlic) from the pan; set aside.
4. Add the remaining 2 tablespoons olive oil, chicken, season with salt and pepper, and cook the chicken until it’s about 50% cooked through, stirring and flipping intermittently.
5. Remove from the pan; set aside with the sofrito.
6. Add the Rice and cook to toast the rice for about 3 minutes, stirring intermittently.
7. To the chicken broth, add 1 packet Paellero, and stir to combine.
8. Add the chicken broth to the rice.
9. Add the sofrito and chicken back to the skillet, add the tomatoes, 1 cup water, and simmer over medium-low heat for about 20 to 25 minutes or until rice is tender, chicken is cooked through, and liquid is absorbed.10. If necessary, you may need to add more than 1 cup water (or chicken broth) based on the texture of the rice.
11. Taste it near the end of the cooking period and if it’s too firm and all the liquid is absorbed or nearly so, add a bit more water using your judgment.12. Add the peas, parsley, stir to combine, and cook for 1 to 2 minutes to warm through.
13. Taste the paella and add salt and pepper, if necessary, to taste.
The saltiness of the chicken broth, tomatoes, whether you used Paellero, and personal preference for salt and pepper will dictate how much to use.
I use about 2 teaspoons salt and 1 teaspoon pepper.14. Garnish with lemon wedges and serve immediately.
NOTES
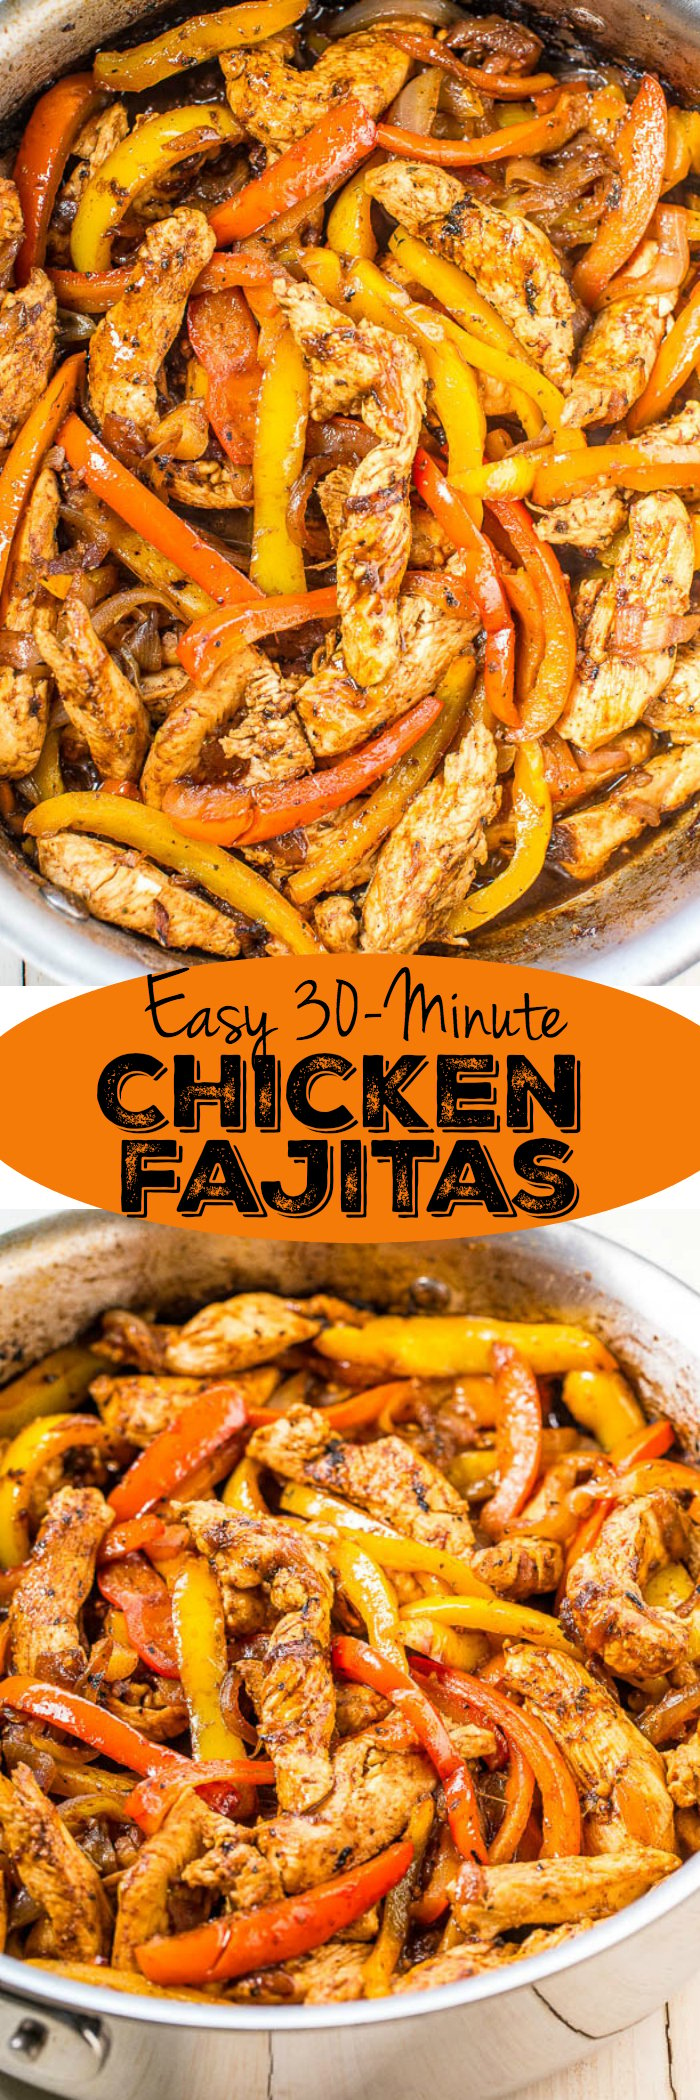
Storage: Paella will keep airtight in the fridge for up to 5 days or in the freezer for up to 4 months.November 24, 2022 at 5:08 pm #200784Chicken Fajitas
Prep time 10 MINUTES
Cook time 20 MINUTES
Total time 30 MINUTESThese easy chicken fajitas are made in one skillet or wok , are packed with flavor, and ready in 30 minutes.

INGREDIENTS
2 to 3 tablespoons olive oil, or as necessary
1 to 1.25-pounds boneless skinless chicken breasts, sliced into 1/2-inch strips
1 medium/large Onion (sweet Vidalia onion), thinly sliced
1 medium red bell pepper, cut into thin strips (orange or green peppers may be substituted)
1 medium yellow bell pepper, cut into thin strips
1/4 cup waterone 1-ounce packet Old El Paso Fajita Seasoning Mix
(Most fajita seasoning mixes are made up of a few simple Mexican spices, like cumin and chili powder, plus some additional spices, like paprika, garlic powder, onion powder, and cayenne pepper.)one 8-count package Old El Paso Flour Tortilla Shells / wraps, for serving
A tortilla is a thin, circular unleavened flatbread originally made from maize hominy meal, and now also from wheat flour. Most shops do their own brand of wraps.Guacamole, Sour cream, Salsa, Cheese, Lime juice, etc. or your favorite toppings, optional
INSTRUCTIONS
1. To a large skillet add the oil, chicken, and cook over medium-high heat for about 3 minutes or until chicken is lightly browned and cooked through; stir and flip intermittently.
2. Remove chicken from skillet (keep the oil and cooking juices in the pan) and set aside.
3. If necessary add a bit more oil, add the onions, and sauté over medium heat for about 5 to 7 minutes, or until they begin to caramelize and soften; stir intermittently.
4. Add the peppers and sauté for about 5 minutes, or until they begin to soften; stir intermittently.
5. Return chicken to skillet.
6. Add the water, fajita seasoning mix, and cook for about 3 minutes, or until chicken is heated through; stir intermittently.
7. Spoon mixture into tortillas (if desired warm them first in a dry skillet for about 15 to 30 seconds per side) and serve immediately.
8. Optionally top the chicken mix from the pan with guacamole, salsa, sour cream, cheese, lime juice, etc. or your favorite toppings.
Fajitas are best warm and fresh.
NOTES
Extra fajita mixture will keep airtight in the fridge for up to 5 days. Reheat gently as desired.
November 24, 2022 at 5:54 pm #200785Kedgeree
A hearty brunchtime meal with smoked haddock, boiled eggs, rice, peas and curry flavours

Ingredients
300g undyed smoked haddock fillet, skin on
2 bay leaves
300ml milk
4 eggs
handful chopped parsley
handful chopped coriander
100g frozen peasFor the rice
2 tbsp vegetable oil
1 large onion, finely chopped
1 tsp ground coriander
1 tsp ground turmeric
2 tsp curry powder
300g easy-cook long grain rice, rinsed under running waterOptional to Serve: Chinese Lettuce and Mango Chutney.
STEP 1
For the rice, heat 2 tbsp vegetable oil in a large, lidded pan, add 1 finely chopped large onion, then gently fry for 5 mins until softened but not coloured.STEP 2
Add 1 tsp ground coriander, 1 tsp ground turmeric and 2 tsp curry powder, season with salt, then continue to fry until the mix starts to go brown and fragrant; about 3 mins.STEP 3
Add 300g rinsed easy-cook long grain rice and stir in well. Add 600ml water, stir, then bring to the boil. Reduce to a simmer, then cover for 10 mins.STEP 4
Take off the heat and leave to stand, covered, for 10-15 mins more. The rice will be perfectly cooked if you do not lift the lid before the end of the cooking.STEP 5
Meanwhile, put 300g skin-on undyed smoked haddock fillet and 2 bay leaves in a frying pan, cover with 300ml milk, then poach for 10 mins until the flesh flakes. Remove from the milk, peel away the skin, then flake the flesh into thumb-sized pieces.STEP 6
Place 4 eggs in a pan, cover with water, bring to the boil, then reduce to a simmer.
Leave for 4½-5 mins, plunge into cold water, then peel and cut the eggs into quarters.STEP 7
Gently mix the fish, eggs, peas, a handful each of chopped parsley and coriander, and rice together in the pan.
Serve hot, sprinkled with a few extra herbs.Serving suggestion : Serve on a bed of Chinese lettuce with mango chutney on the side. Delicious!
November 24, 2022 at 7:06 pm #200786Spaghetti Bolognese
What Is Spaghetti Bolognese
Bolognese sauce is an Italian dish made up of a meat-based tomato sauce served with spaghetti.Best Ingredients For Bolognese Sauce
Whole Plum Tomatoes are best because they are picked and canned at perfect ripeness.
Ground Beef Ground beef that’s 80 – 85% lean ground beef needs some fat to give flavor and keep it tender and moist.
Serve this easy meal with a warm loaf of Garlic Bread for the perfect Italian meal everyone will love!
2 tablespoons olive oil
1 large onion finely chopped
500g / 1lb ground/minced beef
1 teaspoon dried oregano
1 800g (2 tins) / 28oz crushed tomatoes
1 x 285g tin of button mushrooms in water (drain to use)
1 x 400g tin of Chickpeas in water (drain to use)
3 cloves garlic chopped
2 tablespoons tomato paste (UK tomato puree)
1 good sized handful fresh parsley chopped
Salt and pepper to taste
226.8g 1/2lb spaghettiFor serving: Optional Grated Pecorino Romano or Parmesan cheese
METHOD
1. Heat the olive oil in a large pan over medium heat.
2. Add the onions and sauté until lightly golden, 2 to 3 minutes.
3. Add the garlic and fry another minute.
4. Add the ground/minced beef; fry until fully cooked and no pink shows at all in the meat (about 8 minutes).
5. Add the oregano and tomato paste and mix with the meat.
6. Add the tomatoes, mushrooms, chickpeas, parsley and bring to a boil.
7. Season with the salt and pepper.
8. Reduce the heat to low, and cook for at least 15 minutes (you can cook longer for a deeper flavor).9. In the meantime, cook the spaghetti according to the package instructions.
10. Drain and serve topped with the sauce and cheese (if using).TOP TIPS
1. Adding baking soda to meat maintains moisture by stopping the proteins from binding too fast (which dries out the meat).
To do this, mix a ¼ teaspoon of baking soda with a tablespoon of water.
Combine well and then mix it into the meat before cooking.2. Seasoning the meat with salt and pepper adds an extra kick of flavour which is key to speeding up the cooking time of this sauce.
3. Make this sauce your own by adding whatever fresh or dried herbs of your choice or even some red wine which can be added and cooked down before adding the tomatoes.
4. When adding the dried oregano, try rubbing it between your palms to release maximum flavor.
5. Use good quality tomatoes when shopping for ingredients – don’t skimp, the better quality the tomatoes, the better the sauce will be.
6. If you have the time, simmering the sauce for longer will add a deeper flavor.
7. For extra depth of flavor, add a half cup of the wine of your choice before adding the tomatoes
8. To fix bitter sauce, add 1/8 teaspoon of baking soda or a 1/2 teaspoon of sugar to the sauce at a time (tasting between additions) until the acidity dissipates.
9. To make the dish healthier, replace half the minced meat with 1 x 390g tin of Green Lentils in water (drain to use)
10. To measure out a portion of spaghetti, use a coke/pop bottle. Fill with spaghetti until the circumference of the bottle top (unlidded) is full = 1 person.
Measure out the amount of spaghetti for each person accordingly.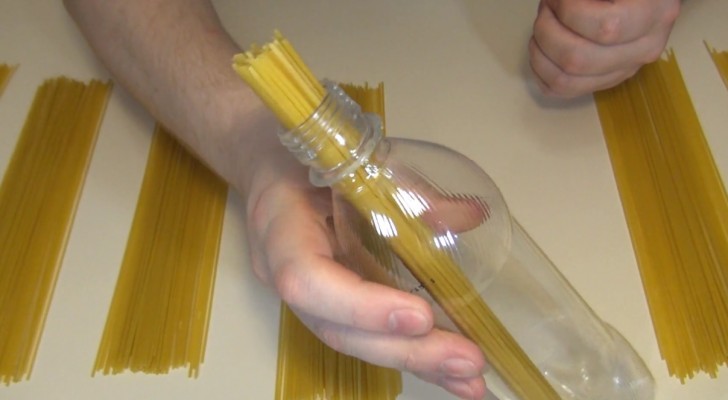
-
AuthorPosts
- You must be logged in to reply to this topic.
Optimizing new Forum... Try it, and report bugs to support.
The forums › Quizz, Fav TV, Fav Music, Fav Films, Books… › Easy Recipes to tickle your Tastebuds