The forums › Quizz, Fav TV, Fav Music, Fav Films, Books… › Easy Recipes to tickle your Tastebuds
- This topic has 127 replies, 3 voices, and was last updated 2 years ago by JessiCapri.
-
AuthorPosts
-
November 24, 2022 at 7:56 pm #200789

Quick and easy 30-minute chicken dinner, this delicious garlic butter chicken bites recipe will be your new family favorite. It’s made in just one skillet for less cleanup. You can serve this as is, or with rice on the side if you’re extra hungry. For a low-carb option, serve with mashed cauliflower or cauliflower rice.
GARLIC BUTTER CHICKEN BITES AND ASPARAGUS
INGREDIENTS LIST
3 boneless, skinless chicken breasts cut into bite-sized chunks
2 bunch of asparagus, rinsed and trimmed
1/2 cup butter, divided (1/4 cup for browning the chicken and 1/4 cup for the sauce)
1 teaspoon olive oil
2 teaspoons minced garlic, divided (1 teaspoon for the chicken bites and 1 teaspoon for the asparagus and sauce)
1 teaspoon Italian seasoning or Herbes de Provence
1 tablespoon hot sauce, optional (I use Sriracha)
1/2 cup (125ml) low-sodium chicken broth
Juice of 1/2 lemon
1 tablespoon minced parsley
Crushed red chili pepper flakes, optional
Slices of lemon for garnishFor the chicken seasoning:
1 teaspoon salt
1 teaspoon fresh cracked black pepper
2 teaspoons onion powderDirections:
First, cut chicken breasts into cubes and season generously.
While the chicken is sitting, blanch asparagus in boiling water to precook them so they cook faster in the skillet.
Stir-fry the chicken bites until golden then add minced garlic and Italian seasoning and stir and cook until fragrant.
Deglaze the skillet with chicken broth, add remaining butter, lemon juice, hot sauce, parsley, then add the blanched asparagus and toss to finish cooking asparagus. Add chicken back to the skillet, reheat, season, and serve!
Tips:
Depending on the thickness of your asparagus, you might want to skip blanching.
You can enrich the sauce by adding some white wine.
Do not overcrowd the pan when cooking the chicken bites. Proceed by batches so each chicken bite has this delicious crisp golden crust! Refrain from stirring the chicken bites constantly. Let them sit in the pan, then turn from time to time, so the chicken gets that nice golden sear on every side.November 24, 2022 at 9:06 pm #200790BOBOTIE
A TRADITIONAL SOUTH AFRICAN RECIPE
A hearty and comforting bobotie recipe, made with curried minced beef, fruit, and a savoury egg custard topping, which is baked in the oven until golden.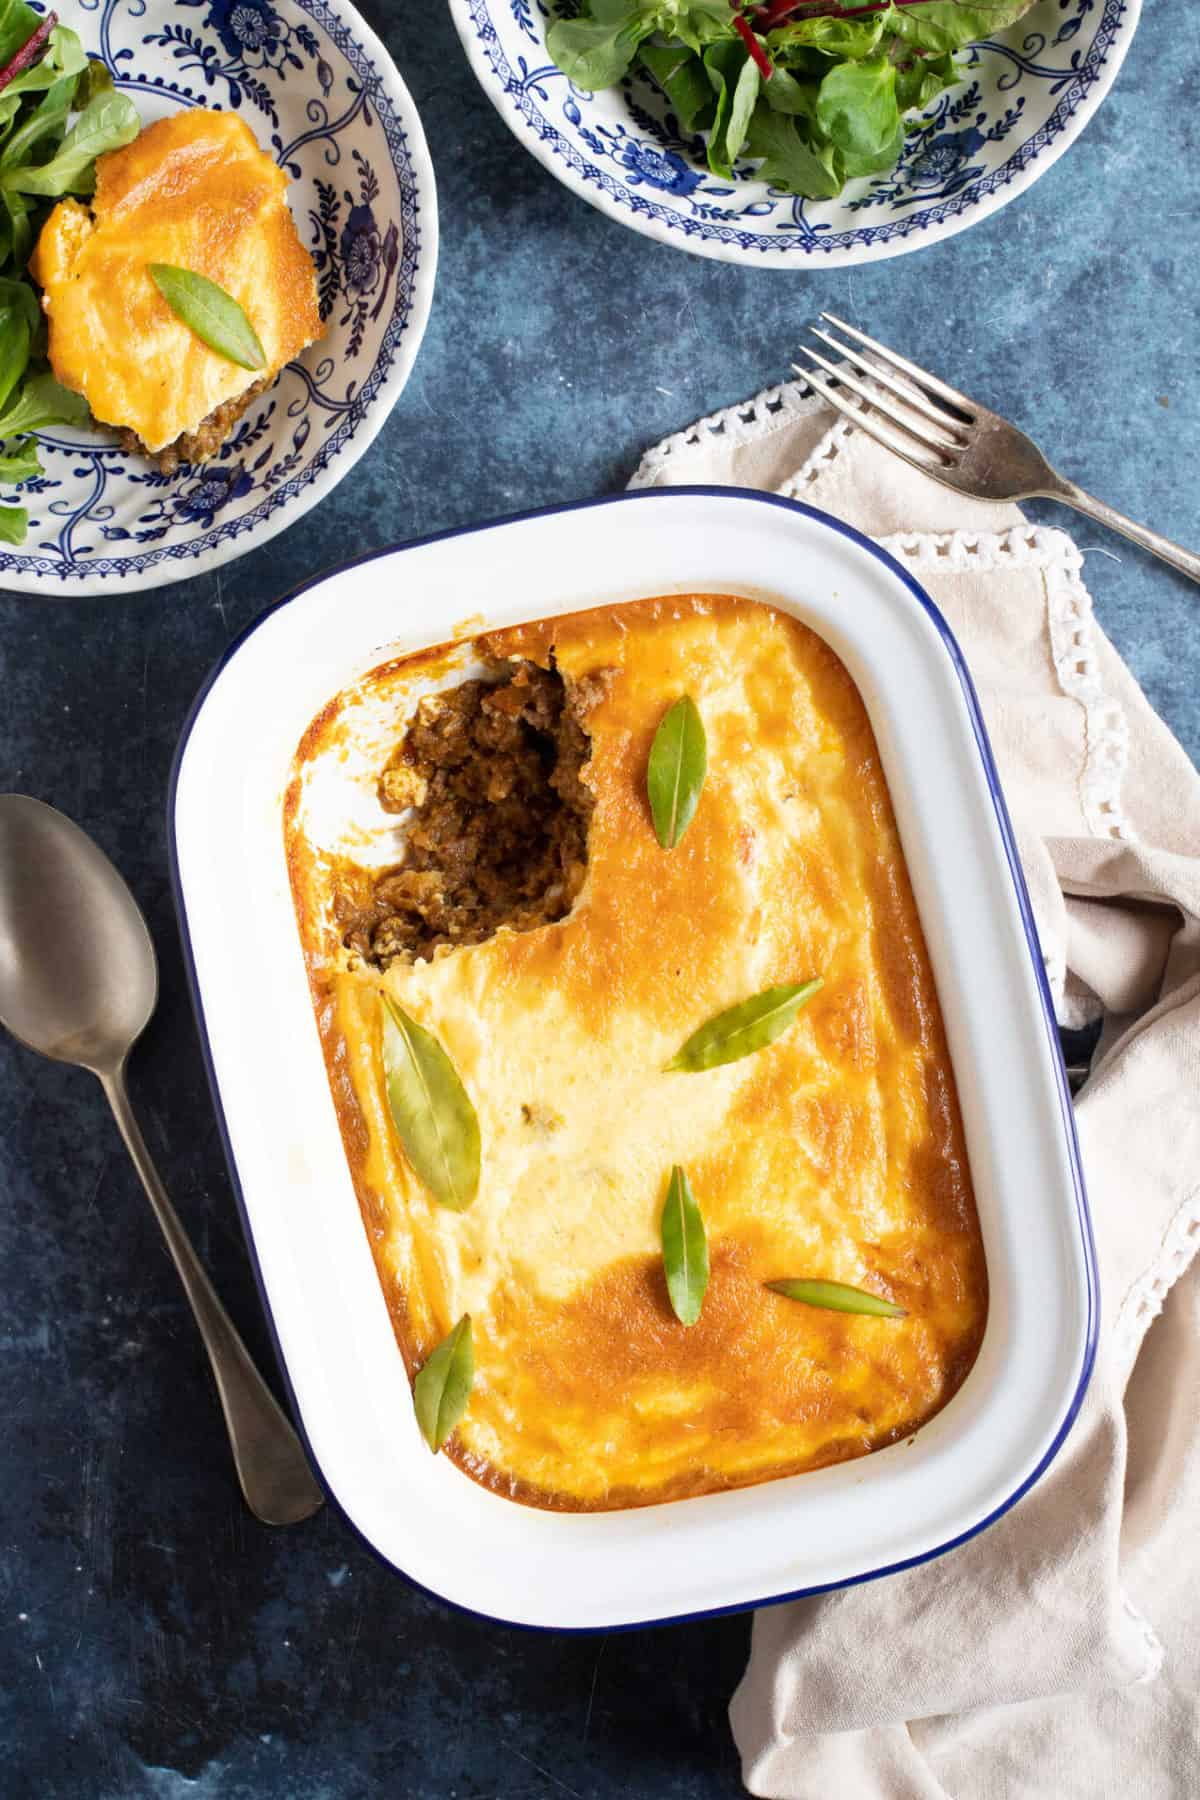

Often considered the national dish of South Africa, bobotie (pronounced ‘ba-boor-tea’) originates from the Cape Malay community, which has also given rise to a number of other dishes that are now considered core to South African cooking, including sosaties and bredie!
Essentially, this easy bobotie recipe is a delicious mixture of curried minced meat and fruit (golden raisins are typical) with a creamy golden topping, not dissimilar to moussaka.
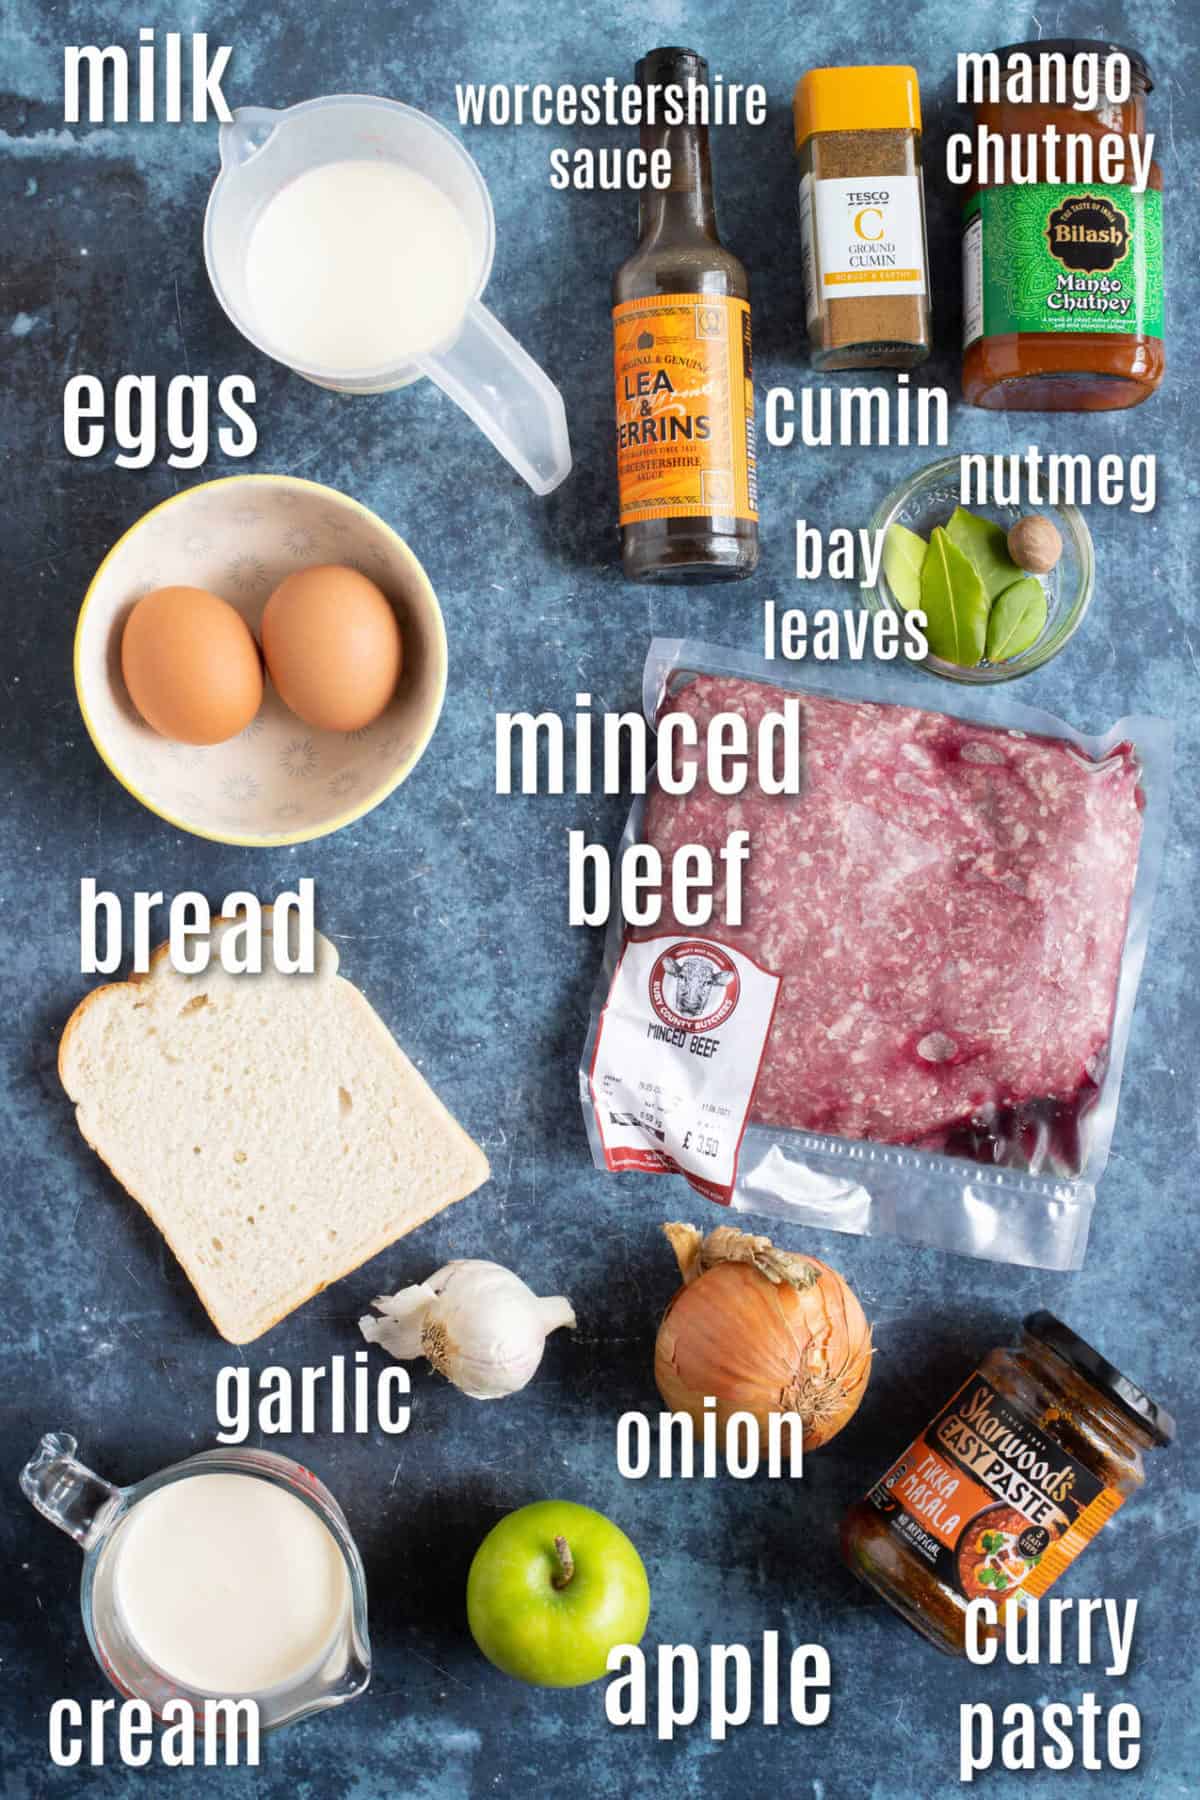
Ingredients
1 Slice of White Bread
100 ml Milk reserve the milk for the topping
20g (1oz) Butter
1 Onion finely chopped
2 Garlic Cloves finely chopped
500g (2 Cups) Minced Beef
2 tablespoon Tikka Curry Paste
½ teaspoon Cumin
1 Green Apple grated
2 tablespoon Mango Chutney
1 teaspoon Worcestershire Sauce
2 Bay Leaves
½ teaspoon SaltInstructions
1. Preheat the oven to 180°C (160 fan/ Gas 4/ 350F).
2. Soak the bread in milk in a shallow bowl.
3. Meanwhile, heat the butter in a frying pan and fry the onions and garlic on a medium heat for 5 minutes until soft.
4. Add in the minced beef and cook until it has changed colour.
5. Mix in the curry paste, cumin, grated apple, mango chutney, Worcestershire sauce, bay leaves, and salt. Simmer for 5 minutes.6. Squeeze the milk from the slice of bread, being careful to reserve this milk as you will need it for the topping, and add it to the minced beef.
7. Stir thoroughly until the bread is combined into the beef mince.
8. Spoon the mixture into an oven-proof baking dish and pack down firmly with the back of a spoon.9. In a jug, whisk together the eggs, cream, nutmeg, and reserved milk and pour it onto the beef mixture.
10. Bake in the oven for 30 minutes until the topping is golden and set. Garnish with extra bay leaves if you like.Top Tips:
1. Make sure the beef mixture is packed down firmly into your baking dish. This will ensure the savoury custard topping does not sink to the bottom of the dish, but instead remain on top, where it will become golden and delicious on baking!2. Save time and make the minced beef mixture ahead of time. Let it cool down first before transferring it to an airtight container and storing it in the fridge.
The curried beef mince can also be frozen for up to 3 months.Variations:
3. This easy Bobotie recipe can be doubled to feed a crowd.4. Add in a handful of chopped dried apricots or raisins for an extra fruity hit.
5. Garnish the baked dish with some toasted pine nuts for crunch and texture.
6.Make it spicy by using a hot curry paste and adding a chopped red chilli at the same time as the onion and garlic.
Storage:
Leftovers can be stored in the fridge for up to 3 days and reheated until piping hot in the microwave.November 25, 2022 at 10:24 pm #200795How To Microwave A Baked Potato
You could spend 15 minutes preheating your oven and then another hour baking a potato, but why would you ever do that when you can microwave your potato in just 7 minutes?! Whether you’re looking for a simple holiday side dish or a low-key weeknight dinner, making your “baked” potato in your microwave instead of the oven is a genius move. Check out our top tips for getting it perfect every time.

Clean it
You’ll need to wash your potato first, especially if you like to eat your baked potato with the skin on (and why wouldn’t you?). Give it a thorough scrub to get all the nitty gritty off, rinse well, and dry it off. Fun fact, your potato is still totally fine to eat even if it has little green spots or has sprouted “eyes”. Simply peel off the offending spots, and then your potato will be good as new.
Poke it
With a fork, stab your potato all over—this helps the steam escape during the heating process to prevent a potato explosion inside your microwave, helps the potato take on a fluffier texture when cooked, and helps it cool off quicker once it’s done so you’ll be on your way to potato-y goodness even sooner. It’s an important step, so don’t skip it! If you want the skin to turn a little crispy, be sure your potato is totally dried off from the wash, then massage it with a little bit of oil right before it hits the microwave. Make sure to cook it whole—don’t cut it up! While it may seem time-effective to cut it up, keeping the potato whole steams them, whereas cutting it into sections will dehydrate the potato, making it rubbery (and no one wants that).
Microwave it.
We like a traditional russet potato for our baked potato, but you can really give any tater variation this same treatment (even sweet potatoes!). Depending on the size and density of your potato, cooking times will vary. Start with 3 or 4 minutes, then flip the hot potato with a pair of tongs and continue with an additional 3 minutes of cooking time. You can tell it’s done if a knife goes through it without any resistance. Add another minute at a time if needed to get the perfect tender, creamy, baked potato.
Top it.
Go easy or go crazy with the toppings, your choice! Just because you’ve made a meal in the microwave doesn’t mean it can’t be exciting. We like it simple with a pat of butter, a dollop of sour cream, a pinch of salt and pepper, and your favorite fresh herbs.
You can also opt for the roads less traveled: pesto with freshly grated Parmesan, a smear of miso and a sprinkling of furikake, or serve with a runny sunny-side up egg and a drizzle of hot sauce.
Furikake is a dry Japanese condiment to be sprinkled on top of cooked rice, vegetables, and fish, or used as an ingredient in onigiri.My favourite topping is grated mature cheddar cheese and coleslaw… delicious
Whether you choose to go plain or load it up with your fav toppings, a baked potato goes with just about any meal.
Pair it with your steak dinner for a classic, filling meal or as a side to your holiday dinner.
Make it the base for a vegetarian dinner, or serve it with some plant-based butter for a vegan side to please!Ingredients
1 russet potato
Kosher salt
Freshly ground black pepper
Butter, for servingMethod
Step 1
Wash potato thoroughly and pat completely dry. Pierce 3 to 4 times with a fork.Step 2
Place potato on microwave-safe plate and microwave 7 minutes, turning over halfway through cooking. If your potato isn’t fork-tender after 7 minutes, continue microwaving in 1 minute increments until fully cooked. Let rest for 2 minutes.Step 3
Split potato down the middle, being careful of steam. Season with salt and pepper, and top with butter before serving.November 29, 2022 at 7:49 pm #200848ROAST TURKEY – THE STRESS-FREE WAY!

1. MAKE SURE YOUR TURKEY IS FULLY DEFROSTED
This is crucial, if the turkey is not defrosted properly it won’t cook properly, leaving you with either underdone turkey (= food poisoning – yikes!!) or very dry and overdone turkey as you have to cook it so long to ensure it’s all fully cooked. (See below for a full guide to defrosting times.)2. ALWAYS GET THE TURKEY OUT OF THE FRIDGE 1 HOUR BEFORE COOKING TIME
This ensures the turkey is at room temperature before you start cooking – meaning that early part of cooking won’t be dedicated to bringing the temperature up from fridge temperature. This results in a shorter cooking time and a juicier, more succulent turkey.3. DON’T STUFF YOUR TURKEY
If you stuff your turkey, you have to cook it for a lot longer to ensure the stuffing is piping hot all the way through (and to ensure you are not at risk of food poisoning). This means the turkey is in the oven much longer, resulting in dried out breast meat!4. COVER THE TURKEY IN FOIL UNTIL THE LAST HOUR OF COOKING
This ensures the skin doesn’t burn before the turkey is cooked and also keeps the juices in!5. COOK THE TURKEY ON A RACK
This allows heat of the oven circulate underneath the turkey, ensuring the turkey cooks evenly (no burnt overcooked bits on the bottom). It also ensures the turkey skin stays crisp all over.6. FILL THE BOTTOM OF THE ROASTING TRAY WITH 250ML (1/2 PINT) WATER
This is another fab tip to keep the breast meat moist. During the first part of cooking the turkey is almost steamed as there is all that water plus the turkey is encased in foil helping to keep all that moisture in.7.REMOVE THE FOIL FOR THE LAST HOUR
To get really crispy skin!8. TURN THE OVEN UP FOR THE LAST 30 MINUTES
I cook my turkey at 180C (160 fan / gas mark 4 / 350F) for the majority of cooking time, but then whack the oven temp up to 220C (200C fan / gas mark 7 / 425F) for the last 30 minutes – this gives really crispy skin, but isn’t long enough for the turkey to dry out. It also means the oven is the perfect temperature for getting properly crispy roast potatoes!9. REST THE TURKEY FOR 30 MINUTES UNCOVERED
Most recipes suggest you rest the turkey for an hour covered in foil and tea towels. Not only is this a whole load of extra faff right when your time could be better spent elsewhere, but it also means that carefully crisped up skin won’t be crispy anymore! I’ve experimented a bit and I think half an hour is plenty to allow the meat to become tender. After 30 minutes the turkey is still very warm, even if left totally uncovered (especially if it’s in a hot kitchen – which, let’s face it, is pretty normal on Christmas day!).10. DON’T THROW AWAY THE TURKEY GIBLETS!
So you know that little white packet of turkey innards that you get inside the cavity of your Christmas turkey that most people throw away? DON’T THROW IT AWAY!!! There is amazing flavour to be had from inside that magic packet. And the good news is that it can be turned into a delicious turkey gravy in just a couple of simple steps.HOW LONG SHOULD YOU COOK A WHOLE TURKEY IN THE OVEN FOR?
This obviously depends on your turkey size. But as a guide, roast your turkey at 180C / 160C fan / gas mark 4 /350F for 20 mins per kg plus 90 mins, turning your oven up to 220C / 200C fan / gas mark 7 / 425F for the last 30 minutes.HOW MUCH TURKEY DO YOU NEED PER PERSON?
Now this really does depend on appetite! But based on medium adult appetites, you should allow 500g per person for a whole turkey, 325g per person for a turkey crown and 250g per person for a turkey breast joint (all based on uncooked turkey weight including bones etc.). Do remember kids are likely to only eat a very small amount and older relatives often have smaller appetites too.
NOTES
Cooking time based on cooking at 180C / Fan 160C / Gas 4 / 350F for the majority of cooking time, turning your oven up to 220C / 200C fan / gas mark 7 / 425F for the last 30 minutesHOW LONG CAN YOU KEEP TURKEY LEFTOVERS IN THE FRIDGE?
Turkey leftovers can be kept in the fridge for 3-4 days. However, it is really important you get the leftovers into the fridge within 2 hours of being cooked to avoid food poisoning.If you choose to reheat leftovers, ensure you do this until they are piping hot
CAN YOU FREEZE ROAST TURKEY LEFTOVERS?
Absolutely! Turkey leftovers can be frozen very successfully. Having a stash of leftover turkey in your fridge ensures cheap, healthy and delicious meals throughout January.To freeze turkey leftovers, divide up the meat into meal sized portions and put into freezer proof boxes and freeze.
I like to divide up my leftovers into 400g portions – this is just perfect for a meal for a family of 4.
It’s really important you get your turkey leftovers into the fridge or freezer within 2 hours of being cooked to avoid food poisoning.
If you’ve got them into the fridge straight away, but plan on freezing your leftovers, make sure you transfer the leftovers from the fridge to the freezer ASAP – certainly within a day or so of refrigerating them.
ROAST TURKEY – THE STRESS-FREE WAY!
Course Main Course
Cuisine American, British
Prep Time 10 minutes
Cook Time 3 hours 10 minutes
Resting Time 30 minutes
Total Time 3 hours 20 minutes
Servings 12 peopleIngredients
Metric – US Customary1 whole turkey defrosted (timings are given above for a 5kg/11lb turkey. Please refer to the recipe and notes for alternative size turkeys and timings.)
2 tablespoons olive oil
Salt and pepper
250 ml (1 cup) cold waterInstructions
1. Remove your turkey from the fridge about an hour before you are going to cook it.
2. Preheat your oven to 180C / 160C fan/ gas mark 4 / 350F about 15 minutes before you want to start cooking your turkey.
It is really important that your oven is at the right temperature before you start.
3. Next, drizzle 2 tablespoons of olive oil over the turkey and add a pinch of salt and a good few twists of black pepper. Rub the oil, salt and pepper all over the bird and place, breast side up on a rack in a roasting tray.
4. Pour 250ml cold water into the base of the roasting tray.
5. Calculate the roasting time based on 20 mins per kg plus 90 mins.
See notes for precise cooking times. This is the TOTAL TIME the turkey will be in the oven for.
6. Cover the turkey in foil and roast for 1 hour LESS than the total time you have calculated. The foil will help keep the breast meat juicy and stop the skin browning too soon and burning before the meat is cooked.
7. When there is 1 hour remaining of the TOTAL TIME, remove the turkey from the oven and remove the foil.
Baste the turkey with the juices you find at the bottom of the tin.
8. Put the turkey back in the oven, uncovered this time, for a further 30 minutes.
9. After this 30 minutes, turn the oven up to 220C / 200C fan / gas mark 7 / 425F, remove the turkey from the oven and baste with the juices.
10. Return the turkey back to the oven for a final 30 minutes. Cooking the turkey at a higher temperature will help the turkey skin to brown and crisp up.
11. This is also the perfect temperature for roast potatoes, meaning you can start them now and they will be ready when the turkey has rested for 30 minutes.
12. After a final 30 minutes (the turkey will now have cooked for the TOTAL TIME you calculated in step 3), remove the turkey from the oven and check it is done. Stick a small sharp knife in the fattest part of the turkey (between the breast and the thigh), and the juices should run clear and the meat should be white. If you have a meat thermometer, the internal temperature should be 74C (165F).
13. Transfer the turkey to a clean roasting tin (or similar). Allow the turkey to rest for 30 minutes, uncovered.
It will not get cold and the meat will taste much better for being rested. Not covering the turkey also ensures the turkey will not lose its crispy skin.
14. Use the turkey roasting tray to make delicious turkey gravy.TURKEY GRAVY
When you get your turkey home (or when you’ve defrosted it, if it’s a frozen one), have a feel around inside the cavity and you should find a small plastic packet containing the innards of the turkey plus the neck. (N.B. the neck might be separate.)
Fish it all out and pop it into a saucepan, along with some carrots, onions, peppercorns and herbs (for quantities see the recipe below).
Simmer, strain and freeze (unless it’s Christmas Day, or very nearly, in which case pop it in the fridge).WHAT IF YOU DON’T HAVE ANY TURKEY GIBLETS?
If you don’t have any giblets you can make stock from the carcass of a roast chicken instead. Follow the recipe below, but use a chicken carcass instead of turkey giblets.Course Sauces
Cuisine American, British
Prep Time 10 minutes
Cook Time 45 minutes
Total Time 55 minutes
Servings 6 peopleStock
1 bag turkey giblets (innards/neck/etc.)
1 onion quartered
2 carrots roughly chopped
4 black peppercorns
2 bay leaves
1 sprig rosemary and/or thyme
2 tablespoons parsley stalks
500 ml (2 Cups) cold waterGravy
Turkey stock you made earlier (or 500ml/2 cups shop bought turkey stock)
2 tablespoons flour
1 unwashed turkey roasting trayInstructions
Turkey Stock
1. First put all your turkey giblets into a medium sized saucepan.
2. Add the rest of the stock ingredients and put over a medium high heat.
3. Bring to the boil, then turn right down and put a lid on. Leave to simmer away for 45 minutes.
4. After 45 minutes strain the stock through a fine metal sieve into a clean jug/bowl/saucepan and discard all the bits left in the sieve – they have done their job.
5. Allow the stock to cool to room temperature.
6. Pour into an airtight container and freeze until Christmas Day.
7. Defrost your stock for 24 hours in the fridge. Alternatively, you can defrost it the stock by zapping it in the microwave or just melt it in a saucepan over a low heat.Turkey Gravy
1. When your turkey has finished cooking, transfer it to a separate tray or rack to rest, and put the roasting tray over a medium burner on your hob.
2. Bring the juices to the boil and sprinkle over 2 tablespoons of flour.
3. Stir well until all the flour has been incorporated, then tip in the turkey stock you made earlier.
4. Bring to the boil, then turn off and tip the gravy into a saucepan.
5. Bring back to the boil and simmer for 5 minutes just before you want to serve the gravy.
6. You may wish to sieve your gravy for a smoother finish.Notes
Suitable for freezing. November 30, 2022 at 10:04 pm #200854
ROAST POTATOES

Quick, easy and delicious, these Easy Peasy Roast Potatoes are perfect for your Sunday lunch…in fact they are so quick and simple to make, you could even have them as a midweek treat!
Adding in red onions, garlic and rosemary really adds to the deliciousness of these Roast Potatoes, but they are not essential, so leave them out if that’s all too much faff for you!
Course Side Dish
Cuisine British
Prep Time 10 minutes
Cook Time 1 hour 10 minutes
Total Time 1 hour 20 minutes
Servings 4 peopleIngredients
Metric – US Customary
Olive oil
Salt and pepper to taste
1 kg (2¼ lb) potatoes peeled and chopped
1 large red onion peeled and chopped into 8 wedges
6 garlic cloves gently bashed (don’t remove the skin)
4 sprigs of rosemaryInstructions
1. Pre-heat the oven to 220C / 200C / gas mark 7 / 425F.
2. Drizzle a baking tray with enough oil to nearly coat the bottom of the tray and sprinkle with salt and pepper. The baking tray should be large enough to fit all the potatoes in a single layer. (Use two if necessary.)
3. Put the baking tray in the oven.
4. Peel and chop the potatoes into quarters (or more pieces if large – as a guide each piece should weigh roughly 50g / 2oz, but it doesn’t matter if some are a bit smaller or larger)
5. Put the potatoes into boiling water and cook for 12 minutes on a medium heat – start timing from the moment you put the potatoes into the water.
6. Drain the potatoes and put them back in the saucepan.
7. Put the lid on and shake the pan to rough up the edges, then tumble the potatoes into the baking tray, taking care not to splash yourself with hot fat, and turn the potatoes in the oil to coat them.
8. The potatoes need to cook for about 1 hour in total.
9. After about 15 minutes get the potatoes out and spoon the hot fat over the potatoes to baste them, repeat after 30 minutes and 45 minutes. (This step is not strictly necessary but it will make the potatoes crispier and more delicious.)
10. When you get the potatoes out at the 30 minute mark, add in the onions, garlic and rosemary before basting.Notes
If you are in a hurry, chop your potatoes up a bit smaller – say 30g / 1oz pieces – and they will cook in the oven in 45 minutes.
If you do this, add in the onions, garlic and rosemary after 15 minutes.November 30, 2022 at 10:07 pm #200855
RED WINE BROWNIES
6 ounces semi-sweet or dark chocolate
¾ cup butter plus extra for greasing the pan
¼ cup white or dark rum I use Bacardi white rum.
4 eggs
¾ cup white sugar granulated or caster sugar
¾ cup walnuts, finely chopped
¼ cup all purpose flour All purpose flour is known as plain flour in the UK.
½ cup dried cherries
¼ cup good red wine Cabernet Sauvignon or Pinot Noir work particularly wellFor those using metric measurements
170 grams semi-sweet or dark chocolate
170 grams butter plus extra for greasing the pan
60 ml white or dark rum I use Bacardi white rum.
4 eggs
150 grams white sugar granulated or caster sugar
85 grams walnuts, finely chopped
4 tablespoons all purpose flour All purpose flour is known as plain flour in the UK.
8 tablespoons dried cherries
60 ml good red wine Cabernet Sauvignon or Pinot Noir work particularly wellEQUIPMENT
1-8 inch (21cm) square pan
1 small saucepan
1 wooden spoon
1 large saucepan
1 medium bowl
measuring cups or a scale
measuring spoonsINSTRUCTIONS
Preheat the oven to 325°F (160°C or 150°C for fan assisted ovens).
Grease an 8 inch (21 cm) square pan well with butter.
Put the dried cherries and the red wine into a small saucepan and heat over low heat until the cherries begin to absorb the wine and plump up. Set aside to cool a little.
Meanwhile, melt the butter and the chocolate together over very low heat in a large saucepan. Stir occasionally with a wooden spoon until the butter and the chocolate have just melted together.
Remove the saucepan from the heat and stir in the rum with a wooden spoon. Set aside to cool a little.
Beat the eggs and the sugar together in a medium bowl until light and fluffy.
Slowly add the eggs and sugar to the slightly cooled chocolate mixture in the large saucepan, stirring constantly.
Stir in the flour until well combined.
Add the cherries and the chopped nuts and stir in well. (The cherries should have soaked up all the red wine by now. However, if they haven’t and there is just a little left you can stir that into the batter with them.)
Scrape the batter into the prepared 8 inch square pan and bake in the oven for 20 to 25 minutes or until just cooked. The brownies should still be slightly squidgy in the centre.
Set aside to cool before cutting into the brownies squares and serving.————
Tips for Making the Best Brownies
Use high-quality chocolate for the best flavour.
Consider using a non stick pan and always grease the pan well so that brownies are easy to remove.
Don’t over-bake the brownies. Most brownies will cook within 20 to 25 minutes. They should be a little soft in the middle for a lovely chewy texture.
Let the brownies cool completely before cutting into squares. This makes for a cleaner edge to each brownie. Also, you can carefully wipe the knife with a hot cloth between slices.November 30, 2022 at 10:22 pm #200856DUCK FAT ROAST POTATOES
Duck fat give roast potatoes a wonderful flavour… it also makes them extra crispy!

Where to get Duck Fat.
You can easily buy duck fat from the supermarket these days. Alternatively, roast a whole duck in the oven and, part way through, drain the fat off into a new roasting tin, before returning the duck to the oven. Turn your par boiled potatoes in the hot fat, then place in the ovenWHAT TO SERVE DUCK FAT POTATOES WITH?
The most obvious thing to serve roast duck fat roast potatoes with is a whole roast duck!
Alternatively, you could serve these delicious roasties with roast duck legs, roast chicken, roast turkey or roast beef.Course Side, Side Dish
Cuisine British
Prep Time 5 minutes
Cook Time 55 minutes
Total Time 1 hour
Servings 4 peopleIngredients
Metric – US Customary
4 tablespoons cold duck fat (Or whatever you find in the duck roasting tray!)
1 kg white potatoes peeled and cut into 50g/1¾oz pieces (The kind sold as baking potatoes work best.)
Salt and pepper to tasteInstructions
1. Preheat your oven to 220C / 200C fan / gas mark 7 / 425F.
2. Place the cold duck fat into a large roasting tin and place into your heating oven.
3. Meanwhile, peel and cut your potatoes into pieces approximately 50g/1¾oz. (It doesn’t have to be exact!)
4. Place your chopped potatoes into a large saucepan and cover with boiling water from the kettle.
5. Turn the heat on high and cook for 12 minutes. (Start timing straight away, not when the water starts boiling.)
6. Drain the potatoes thoroughly and return to the pan.
7. Allow to steam dry for 5 minutes, then place a lid on the pan and shake hard to rough up the edges and maximise the amount of crispiness!
8. Remove the fat from the oven and carefully tip the potatoes into the hot fat. (Take care not to splash the fat as it is VERY hot and will burn you if it touches your skin!)
9. Quickly turn the potatoes in the hot fat and then return the tray to the oven.
10. Cook the roast potatoes for 45 minutes to 1 hour, depending on how crisp you like them!
11. To ensure even cooking and maximum crispiness, remove the potatoes from the oven twice during cooking and turn the potatoes in the hot fat / spoon the hot fat over the potatoes. Work quickly and then return the roasties to the oven.Notes
1. If you are cooking a whole roast duck and wish to use the fat from the roast duck for your roast potatoes, simply cook the duck for 30 minutes, then remove the duck from the oven and tip all the fat that has collected in the duck tin into a new roasting tin, before returning the duck to the oven.
Turn your par boiled potatoes in the hot fat in the new tin, then place in the oven and follow the rest of the recipe as stated.
2. Suitable for freezing.WHAT TO DO WITH LEFTOVER DUCK FAT ROAST POTATOES?
Duck fat roast potatoes are so delicious that it is extremely unlikely you will end up with any leftover roast potatoes. However, if you do, simply place in a plastic lidded container and store in the fridge, where they will keep for up to 3 days.Either eat cold, or reheat in an oven set to 220C (200C fan / gas mark 7 / 425F) for 10 to 15 minutes, or until piping hot all the way though!
CAN YOU FREEZE DUCK FAT ROAST POTATOES?
Yes, you can. Follow the recipe as stated, but only roast for 30 minutes.
Allow to cool then put the part-roasted potatoes in a lidded container and place in the freezer, where they will keep for up to 3 months.Defrost overnight in the fridge, then place in an oven heated to 220C (200C fan / gas mark 7 / 425F) and roast for a further 30 minutes, or until piping hot all the way through and done to your liking
November 30, 2022 at 10:34 pm #200857ROAST SWEET POTATOES WITH ROSEMARY AND GARLIC
A great alternative to traditional roast potatoes, Roast Sweet Potatoes with Rosemary and Garlic are quick and simple to make and packed full of flavour and goodness. They are delicious with a classic roast dinner… but equally at home with midweek favourites, such as burgers, fish and chicken.

Roast Sweet Potatoes taste delicious, they are also packed full of nutritional goodness. Sweet potatoes are a good source of fibre and contain lots of vitamins and minerals, such as iron, calcium, selenium, B vitamins and vitamin C. They’re also high in beta-carotene and contain antioxidants, which have been shown to reduce the risk of cancer.
Better still, sweet potatoes, unlike white potatoes, count as one of your five a day. To get the most nutrition from your sweet potatoes, don’t peel them as the skin contains much of the goodness! Roasting sweet potatoes, as I do in this recipe, will soften the skins and make them much more pleasurable to eat.
You can use these Roast Sweet Potatoes with Rosemary and Garlic as a direct swap for regular roast potatoes in a traditional roast dinner or Christmas dinner.
They are the perfect partner to roast chicken or roast turkey, for example.But these roast sweet potatoes also work well with any dish where you would normally have chips (fries), for example with beef burgers, fish and chicken.
CAN YOU REHEAT ROAST SWEET POTATOES?
Yes, absolutely. Simply put any leftover sweet potatoes in a lidded plastic container and place in the fridge, where they will keep for 3-4 days.You can eat them cold or reheat in an oven set to 220C (200C fan / gas mark 7 / 425F) for 10 minutes or until piping hot all the way through.
CAN YOU FREEZE ROAST SWEET POTATOES?
Yes – simply put any leftover sweet potatoes in a lidded plastic container and place in the freezer when they have cooled to room temperature.
They will keep for up to 1 month.When you are ready to eat the frozen roast sweet potatoes, defrost overnight in the fridge and then eat cold or reheat as above.
Course Side Dish
Cuisine American, British
Prep Time 5 minutes
Cook Time 25 minutes
Total Time 30 minutes
Servings 4 peopleIngredients
Metric – US Customary
1 large sweet potato (roughly 500g / 1lb) chopped into 1cm / ½inch cubes
2 tablespoons olive oil
Salt and pepper to taste
3 sprigs rosemary leaves only, chopped finely
3 cloves garlic crushed or gratedInstructions
1. Preheat your oven to 220C / 200C fan / gas mark 7 / 425F.
2. Place the sweet potato cubes on a large non-stick baking tray, drizzle over the olive oil and sprinkle with plenty of salt and pepper.
3. Turn the sweet potato cubes to coat them evenly in the oil, then ensure the cubes are well spread out (use 2 baking sheets if necessary) and in a single layer. 4. 4. Roast in the oven for 15 minutes.
5. Remove from the oven, sprinkle over with the garlic and rosemary. Turn the cubes to get them all coated in the rosemary and garlic.
6. Return to the oven for a further 10 minutes.
7. Serve as part of a roast dinner or with burgers, chicken, fish or anything you usually serve with chips (fries)!Notes
1. It’s super important to ensure the sweet potato cubes are spread out well over the baking sheet – if they are touching each other too much or piled on top of each other they will steam rather than roast… which won’t taste anything like as nice!
2. Suitable for freezingDecember 1, 2022 at 2:15 pm #200860PARMENTIER POTATOES
Delicious mini roast potatoes coated in garlic and herbs, these Homemade Parmentier Potatoes are a favourite side dishes.
Perfect as an alternative to traditional roast potatoes to go with your Sunday roast dinner…but really quick to make, so great midweek too!
A FEW TIPS FOR PERFECT PARMENTIER POTATOES
1. Use a good all-rounder potato – something that says on the label it’s good for roast potatoes AND chips is perfect.
2. Don’t parboil the parmentier potatoes too much or they will end up turning into mush – just 5 minutes is plenty.
3. Unlike traditional roast potatoes, don’t shake the pan when you’ve drained the potatoes after par boiling or they will lose their lovely shape.
4. Don’t add the garlic/herb mixture until the last 15 minutes or the garlic may burn.
5. Make sure your potatoes are in a single layer on the oven tray and ideally not touching too much, or they will not come out nice and crispy. If necessary, use 2 or 3 trays rather than crowding them.
6. These Easy Homemade Parmentier Potatoes also reheat beautifully…if you make too many that is!
Simply refrigerate the leftover parmentier potatoes until needed, then pop on a baking tray and into an oven pre-heated to 200C / 180C fan / gas mark 6 / 400F and reheat for 15-20 minutes, or until piping hot all the way through.
Not only is this neat little trick great for leftovers, but it also means you can make these gorgeous little mini roast potatoes ahead of time and simply reheat when needed – great if you are entertaining a crowd and need one less job to stress about!Course Side Dish
Cuisine French
Prep Time 10 minutes
Cook Time 35 minutes
Total Time 45 minutes
Servings 6 peopleIngredients
Metric – US Customary
3 tablespoons olive or rapeseed oil
1 kg (2¼ lb) white potatoes peeled and cut into 1cm/½inch cubes
Salt and pepper to taste
2 sprigs rosemary leaves only, chopped finely
2 sprigs thyme leaves only, chopped finely
3 cloves garlic grated or crushedMethod
1. Preheat your oven to 220C / 200C / gas mark 7 / 425F.
2. Place the oil in a large roasting tin / oven tray with sides and place in the oven to heat up.
3. Place the chopped potatoes into a large saucepan.
4. Pour over boiling water and par boil on a high heat for 5 minutes (start timing from the moment the potatoes go on, NOT from when they come back up to boiling).
5. Drain the potatoes in a sieve or colander and then return them to the pan to steam dry for 5 minutes (DON’T shake them or they will lose their shape.)
6. Carefully remove the hot oven tray from the oven and tip in the potatoes and add a little salt and pepper. Turn the potatoes in the hot oil, spread the potatoes out on the tray in a single layer and return to the oven.
7. Cook for 15 minutes.
8. Meanwhile mix the garlic and herbs together in a small bowl.
9. After 15 minutes, remove the potatoes from the oven. Add the garlic and herbs mixture and turn the potatoes in the garlic and herbs to ensure they are all coated. 10. Spread out again in a single layer and cook for a further 15 minutes or until golden and crispy.
11. Serve as part of a roast dinner, or as a side dish to any meal where you might otherwise serve mashed potatoes or chips!Notes
1. To reheat, place the parmentier potatoes on a baking tray in a single layer and cooked in an oven pre-heated to 200C / 180C fan / gas mark 6 / 400F.
2. Reheat for 15-20 minutes, or until piping hot all the way through.December 1, 2022 at 2:37 pm #200861Basic Mashed Potatoes
If you love good, old-fashioned mashed potatoes, this is the perfect recipe.
Made with white potatoes, milk, butter, and optional garlic. Homemade mashed potatoes is a classic holiday dish.
These mashed potatoes come out smooth, creamy, and delicious every time. Serve with gravy or extra butter on top.:max_bytes(150000):strip_icc():format(webp)/24771-basic-mashed-potatoes-mfs318-ed832ab37551471cba0997410217d4c5.jpg)
Prep Time: 15 mins
Cook Time: 20 mins
Total Time: 35 mins
Servings: 4Ingredients
2 pounds baking potatoes, or potatoes of your choice peeled and quartered
3 cloves garlic, peeled, or to taste (Optional)
1 cup milk
2 tablespoons butter
salt and ground black pepper to tasteHow to Make Mashed Potatoes
1. Boil the potatoes:
Bring a large pot of salted water to a boil.
Add the potatoes and garlic to a large pot of salted, boiling water.
2. Reduce the heat and simmer until the potatoes are tender. Lower heat to medium, and simmer until potatoes are tender, 15 to 20 minutes.
Peeled and quartered potatoes should be perfectly boiled after about 15-20 minutes. If you leave your potatoes whole, it will take a bit longer.3. Heat the milk:
When the potatoes are almost finished, heat milk and butter in a small saucepan over low heat until butter is melted.4. Mash the potatoes:
Drain the potatoes, then return them to the pot.
5. Slowly add the warm milk mixture, mashing with a potato masher or blending with a mixer until the potatoes are smooth and creamy.
6. Season to taste.Tips
You can use skim, low-fat, or whole milk, or even half-and-half for a richer taste.How to Store Mashed Potatoes
Allow the mashed potatoes to cool completely, then transfer them to an airtight container. Store in the refrigerator for three to four days. Reheat in the microwave, in the oven, or on the stove.Can You Freeze Mashed Potatoes?
Yes, you can freeze mashed potatoes in single or group servings for up to one month.
Thaw them in the fridge overnight or reheat them from-frozen in the slow cooker, on the stove, or in the oven.December 1, 2022 at 2:58 pm #200862Homemade Oven Chips
These Homemade Oven Chips are easy and quick to make, super tasty and so much better for you than shop-bought oven chips.

Course Side
Cuisine American, British
Prep Time 10 minutes
Cook Time 30 minutes
Total Time 40 minutes
Servings 4 peopleIngredients
Metric – US Customary
4 medium baking potatoes roughly 750g / 1½lb in total
2 tablespoons olive oil
Salt and pepper to taste (Black Pepper is best)Instructions
1. Preheat your oven to 220C / 200C fan / gas mark 7 / 425F.
2. Cut the potatoes into chip shapes and place in a bowl. Drizzle with 2 tablespoons of olive oil and add a little salt and pepper. Mix together thoroughly so all the chips are evenly coated in the oil and seasoning.
3. Spread the chips out on the baking trays – you will probably need 2 or 3 to ensure the chips are well spread out and not touching.
4. Put the baking trays in the oven for 10 minutes.
5. After 10 minutes take one baking tray out of the oven and turn all the chips over. Put that tray back in the oven and repeat for the other tray(s).
6. Cook the chips for 10 more minutes, then repeat – turning each chip again.
7. Cook the chips for 10 more minutes (so they have had 30 minutes cooking in total) or until they are done
8. Serve with a nice steak, a homemade burger, a tuna steak or whatever you usually serve chips with.TIPS FOR MAKING REALLY GOOD HOMEMADE OVEN CHIPS
1. Make sure your oven is nice and hot before you start – if the oven is still coming up to temperature the chips will be less crispy.
2. Don’t peel the potatoes – so much of the goodness is in the skins!
3. It is much easier to put the oil, salt and pepper on the chips in a bowl and give everything a good mix before putting them on the baking sheet. This also means you will need less oil than if you try to drizzle the oil on the chips when they are already on the baking tray… And they are less likely to stick.
4. Try to use a metal, non-stick baking tray (or roasting tray). Pizza trays are quite good. Try not to use not glass or ceramic oven dishes as they don’t work so well.
5. Spread the chips out on the baking tray so they are not touching. If you cram too many together they will not cook well and you will end up with very anaemic chips! Much better to spread them out over several baking trays.
6. Do turn the chips at least once while cooking – preferably twice, this helps to ensure the chips cook evenly and don’t stick.
7. Use tongs to turn the chips – it makes it so much easier! If you don’t have tongs – get some! They are not expensive and they are so useful!!
8. Don’t be afraid to let the chips go quite dark in colour – they will taste better (though don’t burn them, obviously!).
9. Eat the chips straight away after they’ve finished cooking, or they will go soggy!December 2, 2022 at 3:50 pm #200867PAN FRIED SPROUTS WITH LEEK AND BACON
Quick, easy and utterly delicious this Pan Fried Sprouts with Leek and Bacon recipe is a great Brussels Sprouts recipe.

The sprouts and leeks are pan-fried in butter before adding cubed smoked bacon – or lardons (Bacon bits).
Serve the Pan Fried Sprouts with Leek and Bacon as part of a roast dinner or with a big pile of creamy mashed potatoes for a quick and tasty supper.Course Side Dish
Cuisine American, British
Prep Time 5 minutes
Cook Time 15 minutes
Total Time 20 minutes
Servings 4 peopleIngredients
Metric – US Customary
30g (1 oz) butter
180g (6½ oz) leeks sliced thinly (4mm ish)
180g (6½ oz) sprouts sliced thinly (4mm ish)
90g (3 oz) bacon diced (or use ready prepared lardons – bacon bits)
Black PepperInstructions
1. Melt the butter over a low heat.
2. When the butter is melted add in the sliced leeks and sprouts.
3. Stir to coat on melted butter then put a lid on and cook over a gentle heat for 10 minutes, stirring occasionally.
4. Meanwhile, fry the bacon / lardons in a separate pan for 5 minutes over a medium-high heat, stirring until golden brown.
5. When the leeks and sprouts are done, toss them in with the lardons and mix together to get the vegetables coated in the bacon juice.
6. Sprinkle with black pepper and serve.
7. Serve as part of a roast dinner or just with a big pile of mashed potatoes for a quick and tasty supper.Notes
NOT suitable for freezing.December 2, 2022 at 5:17 pm #200870ROASTED BRUSSELS SPROUTS

If you have never eaten Roasted Brussels Sprouts, then you are in for a treat! They taste much nicer than plain old boiled sprouts and are much easier to make too… In fact, they are so good, they’ll even turn life-long sprout haters into sprout lovers!
These roasted Brussels sprouts are the perfect addition to your Christmas dinner. They go wonderfully with Roast Turkey and all the trimmings!
But these delicious Roasted Brussels Sprouts are too good to eat only at Christmas… they make a wonderful addition to any roast dinner… or even as a side dish to a regular midweek meal.Course Side, Side Dish
Cuisine British
Prep Time 5 minutes
Cook Time 10 minutes
Total Time 15 minutes
Servings 4 peopleIngredients
Metric – US Customary
400g (14 oz) Brussels sprouts peeled and cut in half (Buy the ready peeled ones to make life easier!)
2 tablespoons olive oil
Salt and pepper to tasteInstructions
1. Preheat your oven to 220C / 200C fan / gas mark 7 / 425F.
2. Place the peeled and halved Brussels sprouts on a large baking tray.
3. Drizzle over the olive oil and scatter over some salt and pepper, then turn the sprouts in the oil and seasoning.
4. Turn each sprout so it is sitting cut-side up and ensure the sprouts are reasonably well spaced out. (Use two baking trays if necessary.)
5. Roast the sprouts in a hot oven for 10-15 minutes or until cooked in the middle and just starting to char around the edges.
6. Serve with all your roast dinner favourites!Notes
NOT suitable for freezing.December 2, 2022 at 5:29 pm #200871Brussels Sprout Chips

YIELDS: 2 – 3 serving(s)
PREP TIME: 5 mins
TOTAL TIME: 25 minsIngredients
227g (1/2 lb) brussels sprouts, thinly sliced
1 tbsp. extra-virgin olive oil
2 tbsp. freshly grated Parmesan cheese, plus more for garnish
1 tsp. garlic powder
Kosher salt (Kosher salt or kitchen salt is coarse edible salt without common additives such as iodine. Typically used in cooking and not at the table, it consists mainly of sodium chloride and may include anticaking agents.)
Freshly ground black pepperCaesar dressing, for dipping.
METHODS.
FOR OVEN
Step 1
Preheat oven to 400°. In a large bowl, toss brussels sprouts with oil, Parmesan, and garlic powder and season with salt and pepper.
Spread in an even layer on a medium baking sheet.
Step 2
Bake 10 minutes, toss, and bake 8 to 10 minutes more, until crisp and golden.
Garnish with more Parmesan and serve with caesar dressing for dipping.FOR AIR FRYER
Step 1
In a large bowl, toss brussels sprouts with oil, Parmesan, and garlic powder and season with salt and pepper.
Arrange in an even layer in air fryer.
Step 2
Bake at 350° for 8 minutes, toss, and bake 8 minutes more, until crisp and golden.
Step 3
Garnish with more Parmesan and serve with caesar dressing for dipping.Caesar Dressing

Ingredients </strong?
2 small garlic cloves, minced
1 teaspoon anchovy paste (see note below)
2 tablespoons freshly squeezed lemon juice, from one lemon
1 teaspoon Dijon mustard
1 teaspoon Worcestershire sauce
1 cup mayonnaise, best quality such as Hellmann’s Real
½ cup freshly grated Parmigiano-Reggiano (parmesan cheese)
¼ teaspoon salt
¼ teaspoon freshly ground black pepperINSTRUCTIONS
1. In a medium bowl, whisk together the garlic, anchovy paste, lemon juice, Dijon mustard and Worcestershire sauce.
2. Add the mayonnaise, Parmigiano-Reggiano, salt and pepper and whisk until well combined.
3. Taste and adjust to your liking.
4. The dressing will keep well in the fridge for about a week.Note: Anchovy paste can be found near the canned tuna in the supermarket.
December 2, 2022 at 5:29 pm #200872BUBBLE AND SQUEAK CAKES (LEFTOVER Sprouts, Vegetables & Potatoes)

A Boxing Day classic reinvented, these Leftover Sprouts Bubble and Squeak Cakes are the ideal way to use up all your Christmas dinner leftovers – especially the leftover Brussels sprouts!
Obviously anytime, there is sprout, mashed or roast potatoes or vegetable left overs, this recipe is one to try.These Leftover Sprouts Bubble and Squeak Cakes make delicious meal in their own right served with salad or baked beans.
Alternatively they make a great side dish to sausages or leftover cold meats.Course Side Dish
Cuisine British
Prep Time 5 minutes
Cook Time 10 minutes
Total Time 15 minutes
Servings 4 peopleIngredients
Metric – US Customary
300g (10½ oz) leftover sprouts (and/or other leftover vegetables)
750g (1½ lb) leftover mashed or roast potatoes
25g (1 oz) butter (or 2 tablespoons olive oil)
4 tablespoons milk (or cream) optional
Salt and pepperInstructions
1. Mash the sprouts (and/or other leftover vegetables) and potatoes together with the milk, salt and pepper. Shape the mash into little burger shapes.
2. Tip a little plain flour onto a plate and roll the bubble and squeak cakes in the flour to coat.
3. Melt the butter in a frying pan over a medium heat. Swirl to coat the base of the pan.
4. Put the cakes into the frying pan and fry for 5 minutes on each side, until golden brown.
If you are doing a lot, or want to do them ahead of time, keep warm on a plate in a low oven and repeat until they are all done.
5. Serve with salad, beans, sausages or leftover cold meats.Notes
Suitable for freezing. -
AuthorPosts
- You must be logged in to reply to this topic.
Optimizing new Forum... Try it, and report bugs to support.
The forums › Quizz, Fav TV, Fav Music, Fav Films, Books… › Easy Recipes to tickle your Tastebuds