The forums › Artist’s Alley › Height Map Tutorial for Texture Editing
- This topic has 10 replies, 9 voices, and was last updated 11 years, 9 months ago by FoxyRoxxy.
-
AuthorPosts
-
May 2, 2012 at 7:02 am #64258
Good work Keiko! and it's nice to see you here again after a while!
May 2, 2012 at 7:11 am #64259Hi Heiko,
Just a question…how do you add it as a background?
May 6, 2012 at 11:15 pm #64260Looks great keiko, more a technical question… In the viewer for the designs, you can load the map as a seperate file. Any idea how that works? When you have made a HM, do you save that as a seperate file? And what format does that file have? .png as well?
I'm just flusterred with the HM's..
") May 7, 2012 at 3:47 am #64261
May 7, 2012 at 3:47 am #64261Hi Heiko,
Just a question…how do you add it as a background?
I'm not sure I understand your question, Susana. Are you asking how to make just the colored texture image, not the height map?
Looks great keiko, more a technical question… In the viewer for the designs, you can load the map as a seperate file. Any idea how that works? When you have made a HM, do you save that as a seperate file? And what format does that file have? .png as well?
I'm just flusterred with the HM's..
The map has to be a seperate file. You should have 2 files for each texture. 1 is the original color texture image, the other is almost like a photocopy of the original. So when you use the viewer, you must load your texture, then load the height map. Again you cannot save the height map to the existing texture as something like a 2nd layer. It needs to be it's own file. To get it just right requires alot of trial and error. Lots and lots of tweaking. It can be a bit more difficult than designing a texture so you need alot of practice and patience.
 August 28, 2012 at 10:14 am #64262
Woah!! This is a great tip, thank you!!!
November 18, 2012 at 5:24 pm #64263this bring back nightmares from my computer programing and photo-shop class back HS……I wasn't very good on the subject lol
December 5, 2012 at 8:00 pm #64264Thank you Keiko!
January 9, 2013 at 6:21 pm #64265That Would be nice,
If people with more experience making suits, , ocasionly, publish some design Tips, for Newbies.
MY OPINION !!At Least When Im starting to be confortable doing that in gimp or phorshop , i will do that here!
So, more people could learn something here,to help improve Achat.Beijos Fofos……..Patricia
June 6, 2014 at 4:30 pm #64266Can we use Marvelous Designer 3 , to make achat dresses?
July 12, 2014 at 8:35 pm #64267This is my attempt at making a HM (Height Map) Tutorial.
I've never made a HM before but after playing around in Photoshop for a bit, I've determined a pretty easy way to get a basic HM started which can be tweaked into what looks best for your texture.
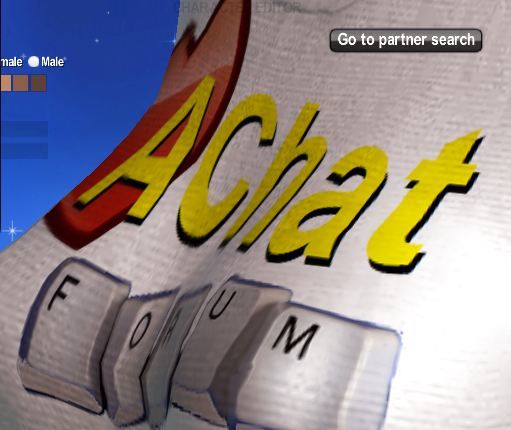
This is what my texture design looks like with the default AChat shirt HM:
- Step 1: Open your .png texture in photoshop.
- Step 2: Select FILTER > SKETCH > PHOTOCOPY… from the top menu
[/list]
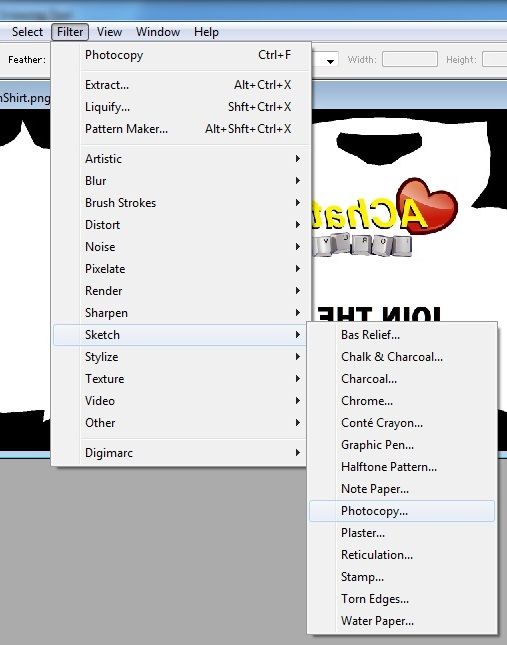
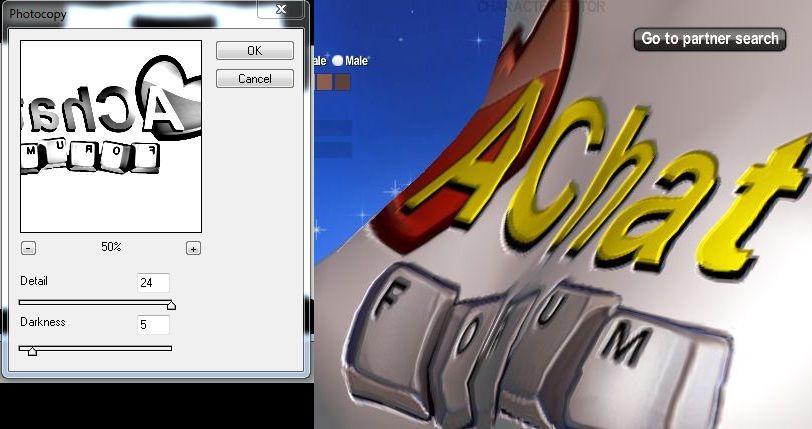
- Step 3: Adjust the “DETAIL” slider to determine how much detail you want the HM (Hight Map) to detect. Adjust the “DARKNESS” slider to determine the obviousness of the hightened areas.
[/list]
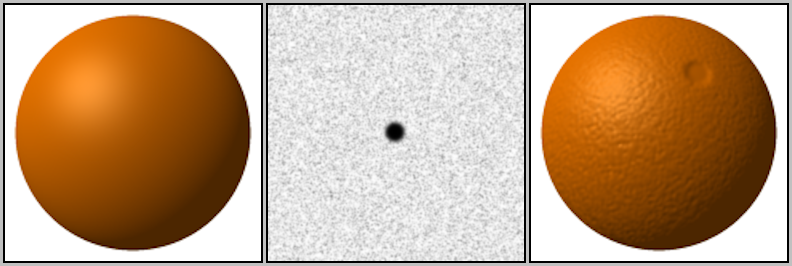
- **TIP** White raises the surface, Black lowers the surface.
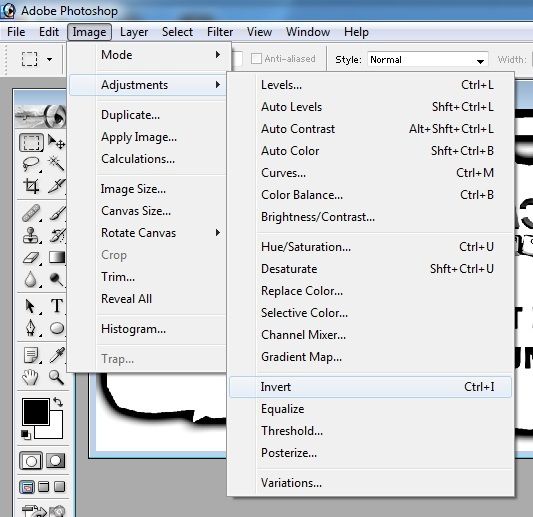
- **TIP2** If you want to invert the appearance of your HM, select IMAGE > ADJUSTMENTS > INVERT
[/list]

I chose this texture to use as the example piece since it's the easiest to compare the different HMs. I also have a very old version of Photoshop so I don't know if the newer versions are set up differently but I assume they should work in a similar fashion. If anyone has special tips or tricks with adjusting the HM, feel free to post it.Thank you for sharing this will keep me busy and it will be nice to play around with it .
-
AuthorPosts
- You must be logged in to reply to this topic.
Optimizing new Forum... Try it, and report bugs to support.
The forums › Artist’s Alley › Height Map Tutorial for Texture Editing